


Whether you’re new to the game or a seasoned professional, working with slack, high-hydration doughs can be challenging. They resist kneading, they stick to our hands, they’d rather slump than rise. But don’t give up. Over many years, in bakeries and my home kitchen, I’ve found a few tips — from baker’s math to folding, fermentation, and proofing — that will help you achieve the best bread of your life.
(To see these tips in action, be sure to check out our video 5 Tips: Working With High-Hydration Dough.)
Before we can get you out of what probably feels like a sticky mess, we need to know where you are. In dough terms, that means quantifying ratios using baker's math, a.k.a. baker’s percentages. In basic terms, baker’s percentages will clarify exactly how wet your dough is. This is important, as dough hydration will set expectations for how you develop strength (either kneading or folding), shape, and even how you proof.
Let’s do a quick review of baker’s percentages using our Rustic Sourdough Bread.
Rustic Sourdough Bread
227g sourdough starter
600g all-purpose flour
340g water
1 teaspoon yeast
15g salt
Total hydration is found by dividing total water by total flour. In this recipe, the flour value is 600g plus the amount in the starter (which is equal parts flour and water, so the flour is 113g), for a total of 713g flour. The water value is 340g plus the amount in the starter (113g), for a total of 453g water. So, the total hydration percentage in this dough is 453/713, or 63%.
While this isn’t all the information we need, it does help. A 63% hydration dough made with all-purpose flour may be easily kneaded, but if hydration is increased to 80% it will respond better to folds.
We all know that bread is a fermented food like wine, prosciutto, and sauerkraut, but did you know that in addition to flavor, fermentation also serves a functional role in breadmaking?
As yeasts consume available sugars during fermentation, they produce organic acids and alcohol as by-products. The acids reinforce the structure of dough, strengthening and improving elasticity (the rubber-band quality). Without a healthy starter, good dough temperature, and ambient conditions — all of which support dough activity — fermentation will slow.
If fermentation slows too much, dough strength will suffer. While that might work with firmer doughs, with our high-hydration tightrope act, doughs literally fall without good fermentation, unable to support all the water.
How do we guide fermentation?
On my next business card, I’d like to have the word “Baker” replaced with “Fermentologist.” It sounds silly, but most of a dough’s life is spent fermenting, not baking. And who guides fermentation? We do.

Three keys to fermentation:
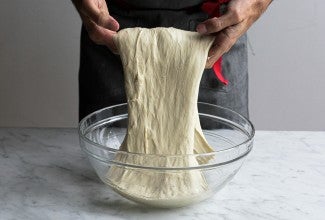
You’ve mixed your dough. The mass is homogeneous, and ahhhhhhhhhh, here comes the part where you work the kinks out of your week. Drop the shoulders, plant your feet, sprinkle a little flour, and settle in for a 10-minute session of blissful kneading. But instead of your usual moment of Zen, high-hydration doughs might leave you up to the elbows with a sticky mess, more stressed-out than ever.
Thankfully, there’s a method to develop strength in these doughs that’s frequently easier than kneading: folding. Here are three types of folds that will effectively strengthen dough (the purpose of kneading!). Our High-Hydration Whole Wheat Sourdough Bread employs each of these folds.
This fold is used in the early stages of fermentation, before the dough has significant structure. As you pull the sides of the dough up and press them into the middle, working around the mass, the dough will slowly gain structure.
This fold is used in the middle stages of fermentation as the dough become more elastic. Lift the dough from the center, allowing it to elongate and stretch, so that it coils around itself.
This fold, similar to a letter fold, is used in the later stages of fermentation when the dough has developed enough elasticity to stretch thinly without tearing. Spreading the dough thinly on a wet work surface significantly increases strength and elasticity.
As with kneading, shaping also improves with a new approach. Using a heavy hand to compress the dough, adding muscle to the mix, is best saved for shaping firmer doughs. Here, a gentler approach is better, applying only the pressure required to seal a seam. Too much pressure and the dough will compress and tear, sticking to everything.
Here are two common shapes:
Cold fermentation (chilling shaped loaves overnight before baking) is a game-changer. What goes into the banneton as a gassy, wobbly mass firms up overnight, improving flavor and creating a skin that takes the cut of my razor or lame more easily. Holding shaped loaves in the refrigerator also allows flexibility in terms of scheduling the bake. I decide when loaves go into the oven, working a bake around my day as opposed to working my day around a bake.
Now that we know our hydration, control fermentation, fold for strength, shape gently, and chill our loaves before baking, let’s take our new skills for a spin.
At 95% hydration, this High-Hydration Whole Wheat Sourdough Bread recipe is technically high hydration. Each loaf is almost equal parts water and flour. But using the tips above, I guarantee you'll find more joy than struggles. Happy baking!
Cover photo by Mark Weinberg.


September 5, 2021 at 12:15pm
My most difficult problem is the dough sticking to the brotform. I have used both wheat and rice flour but sticking is a problem with both.
September 5, 2021 at 1:20pm
In reply to My most difficult problem is… by Jim Foster (not verified)
Hi Jim, for very high-hydration doughs you're probably going to be better off using a well-floured brotform liner or towel to line your basket. I use a blend of half AP and half brown rice flour to prepare my baskets, and when using a liner I rub the flour into the cloth so that it is embedded there, and sometimes even sprinkle a little more flour on top of that if I'm really worried about sticking! Especially if your wet dough is going to be in the brotform for an extended time (like overnight refrigeration), a liner can definitely be a loaf saver!
September 5, 2021 at 12:02am
You said that the loaves develop a skin during cold fermentation in the fridge. Do you not cover them? I've always covered mine with the shower cap, but I can see the advantage of not covering them it it makes it easier to score them in the morning. I've been in this sourdough adventure for 3 years and am still learning. It's totally addictive. ;)
September 5, 2021 at 10:24am
In reply to You said that the loaves… by Sabine C Walter (not verified)
Hi Sabine, I don't think Martin meant that he left the loaves uncovered in the refrigerator, but that refrigeration tends to firm up the surface of the loaf in a way that makes scoring much easier. I generally cover my loaves in the fridge to prevent them from drying out, which could inhibit expansion. I'm sure you've noticed that scoring after refrigeration, even when you cover the loaves, is far easier than scoring a loaf that has proofed at room temperature.
September 2, 2021 at 1:56pm
Hi again- Thanks for the information on cold fermentation of shaped loaves. I am doing that today and have another question.... Do I shape and immediately put the loaves in the fridge or do I let them start proofing on the counter for a while. I shaped mine and immediately put them in the fridge and now after 7 hours there is no change - little sad lumps of dough...
September 3, 2021 at 11:30am
In reply to Hi again- Thanks for the… by sandy (not verified)
Hi Sandy, this can vary from one recipe to the next, but in general if the dough has had adequate time to ferment properly during the bulk ferment, then it works fine to shape the loaves and then put them directly in the refrigerator. I look for the dough to be rising well and noticeably airier in texture as a good sign that it's ready to shape and then refrigerate. In a pinch you could allow the dough to rise for an hour or two after shaping and before refrigeration if you feel like you jumped the gun when it came to the bulk ferment. Now that your dough has been refrigerated, you may find that adding a few hours at room temperature before baking may improve the rise, but you will lose some of the benefits in terms of ease of transferring and scoring that come from baking directly from the fridge. You're still likely to get a nice jump in the oven, even if you bake your loaves directly from the refrigerator, but the overall size of your loaves is likely to be smaller.
September 1, 2021 at 1:04pm
"Cold fermentation (chilling shaped loaves overnight before baking) is a game-changer." How many hours can the dough be in the fridge before it is no longer bake-able?
September 2, 2021 at 1:35pm
In reply to "Cold fermentation (chilling… by NouveauBaker (not verified)
Hi Nouveau. The amount of time a dough can be left in the refrigerator depends on many factors. This could be the temperature of the dough before it is refrigerated, the temperature of the refrigerator itself, if this fridge temperature fluctuates, the type of yeast used, or the amount of yeast used. In short, there is not a standard amount of time that can be provided. We would start with 8-12 hours, monitoring the dough to see how it is progressing and testing it to see if it is close to fully proofed.
September 1, 2021 at 3:52am
Very well explained. Being an absolute beginner , I have a few queries.
Can the same steps be applied to the dough made using yeast.
Does cold fermentation apply to both bulk fermentation and fermentation post shaping for an yeast dough.
If yes, how to check if the dough is well fermented and ready for shaping / baking
September 1, 2021 at 9:39am
In reply to Very well explained. Being… by KJ (not verified)
Hi there,
We have some other great blogs and videos that will help a lot with your questions. Here are some links to check out:
https://www.kingarthurbaking.com/blog/2017/06/19/kneading-wet-dough-by-hand
https://www.kingarthurbaking.com/blog/2019/07/22/bread-dough-bulk-fermentation
https://www.kingarthurbaking.com/videos/martin-bakes-at-home
We hope you find these resources helpful on your bread journey!