


We're dreaming about spring cakes this time of year, so longtime King Arthur baker and professional pastry chef Susan Reid is here to show you how to use a pastry bag for stunning (yet simple) cakes.
* * *
Frosting a cake is the crowning touch to all of your delicious hard work making a beautiful dessert. It’s also a lot of fun, and contrary to what you might think, it doesn’t need to be intimidating. Ultimately, it’s rare that you can’t correct any missteps: just scrape off any frosting mistakes and try again.
For cakes that truly stand out, the best tool you can turn to is a pastry bag. These tools are our partners in the kitchen, and we use them with and without pastry tips. With this one piece of equipment and a couple of basic icing techniques, you can create stunning cake without the need for special tools, ingredients like fondant, or advanced skills.
To help you frost everything from towering layer cakes to casual sheet cakes, here’s a guide to putting your pastry bag to work.
How to open the bag: If using a disposable pastry bag, open it by simply putting the bag between your hands and rubbing back and forth to open the top.
Where to cut the bag: One snip on the end of the bag after filling and you have all you need to dispense doughnut batter or put an even amount of frosting on the sides of a cake to crumb coat it. The trick here is to make a hole that’s large enough for the opening on the tip to clear the bag so it can perform its shaping magic, but not cut the bag so far back that the tip pops out when you squeeze it.
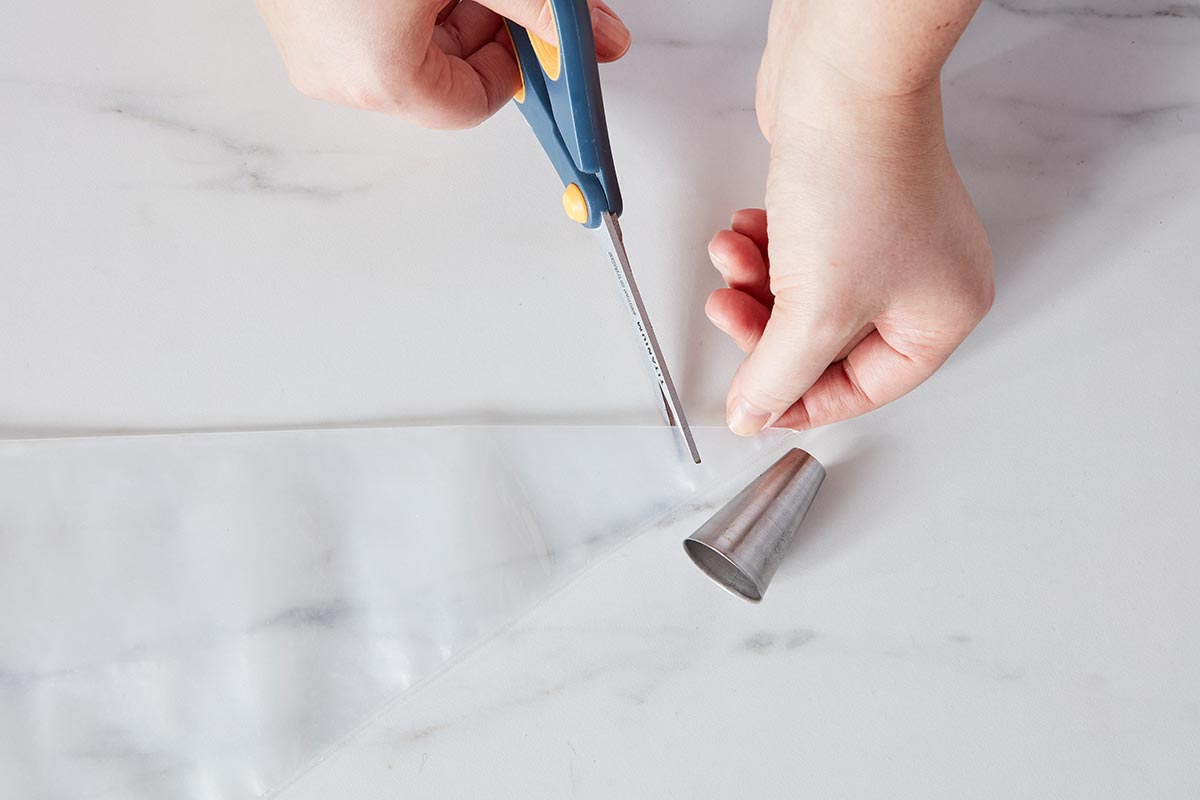
It’s handy to place the tip next to the bag to gauge the point where you should cut. Align the tip next to the end of the bag, then use scissors to cut about 3/4 of the way up the tip.
Baker’s tip: Our pastry bag and tips set are marked exactly where to cut, making this step even easier.
How to fill the bag with frosting: Actually filling your bag can be awkward and clumsy; you really need three hands or an assistant, but if that’s not an option a heavy glass that’s tall enough to hold more than half the bag is a game changer. Put the bag in the glass and fold a good 3" of it over the top edge. Now the bag will stay open and firmly in place while you scoop in your frosting.

How much to fill the bag: The most common mistake people make with pastry bags is to fill them too far, making them harder to maneuver and increasing the chances of frosting backing up out the top when squeezed. Our disposable bags have a convenient feature to know how far to fill them: the sweet spot for the fill line is where the angled edge meets the straight; that’s the maximum amount you should fill the bag.

If you’re using a pastry bag that doesn’t have this shape to guide you, fill it until the frosting is about 3" below the top of the bag.
How to close the bag: In order to prevent globs of frosting from smooshing out the back end of the bag while you squeeze, secure it closed with a binder clip. Simply fold the end of the pastry bag over a few times until closed, then use the clip to secure it. If you don’t have a binder clip, a twist tie or the plastic clip that comes off bread bags are the next best thing. Easy as can be (and saves you a ton of cleanup, especially with kids).
How to pipe with multiple colors: If you’d like to pipe multiple colors, you can use a bag-within-a-bag setup to make things easy. To do so, take two pastry bags and fill each with a different colored frosting. Only fill them about halfway (as there are going to be two of them inside a single bag, and they need to share). Snip the ends of both bags and put them side by side into a third pastry bag. Now you can easily pipe two colors at once for a two-toned effect.

Baker's tip: The coupler attached to the end of this pastry bag is handy even when working with a single frosting color. It allows you to change the piping tip without needing another bag, switching from a round tip to star tip to leaf tip with ease.
With just three separate pastry tips you can create all kinds of different looks and embellishments. Here are some styles and designs for each type of tip.
This tip is useful for piping a dam around the edge of a cake layer to contain filling and for distributing frosting on the sides of a cake before crumb coating, but it also has some design cred of its own. Use it to make tapered dollops that overlay each other for a quilted effect.
How to pipe a quilted design: Place the tip about 1/2" above the surface of the cake. Squeeze gently, without moving, until you have a nickel-sized blob under the tip. Continue to squeeze as you draw the bag toward you, easing up the pressure as you go to create what looks like a tail. Make a row of these blob-tailed frosting mounds, then repeat the process, piping the next blobs halfway down the tails of the first row on the cake. Keep going until the cake is covered.
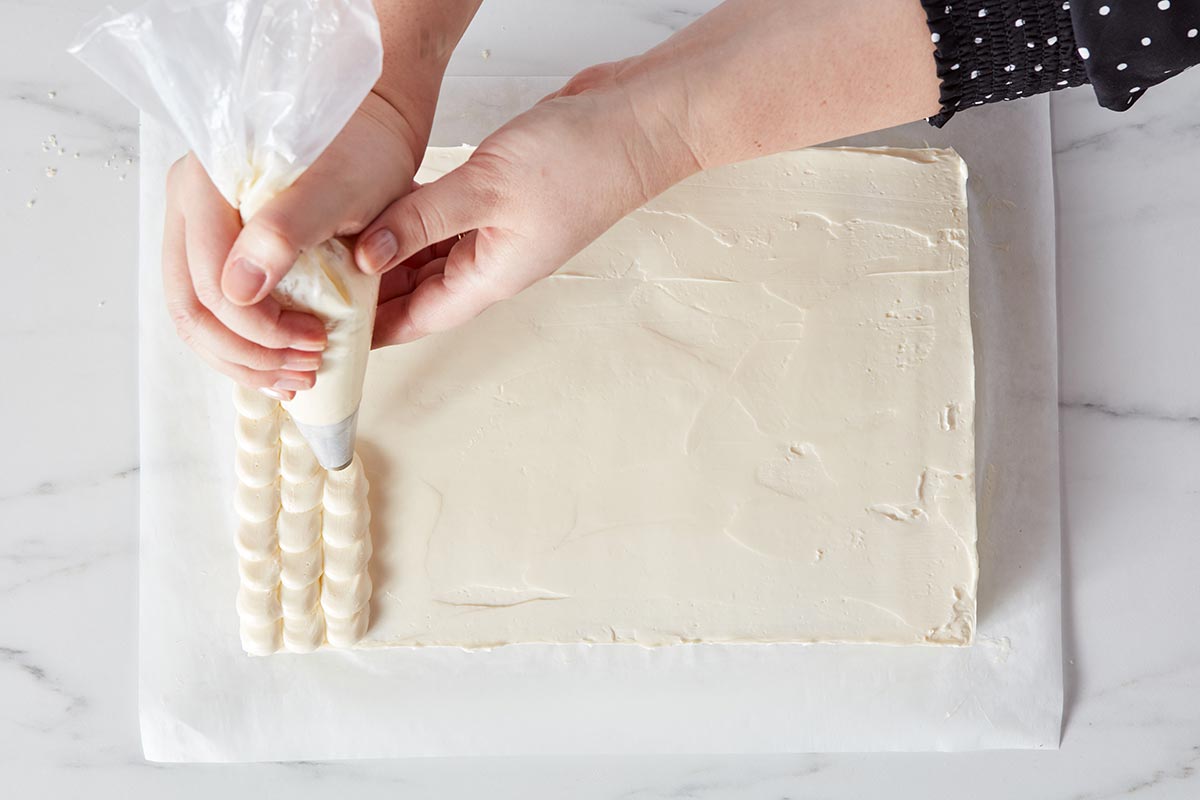
If you could only have one tip, this is the one. A star tip makes stars, obviously, but it's also the one to reach for to make rosettes, seashell borders, garlands, and a basket weave on top of pies or cakes.
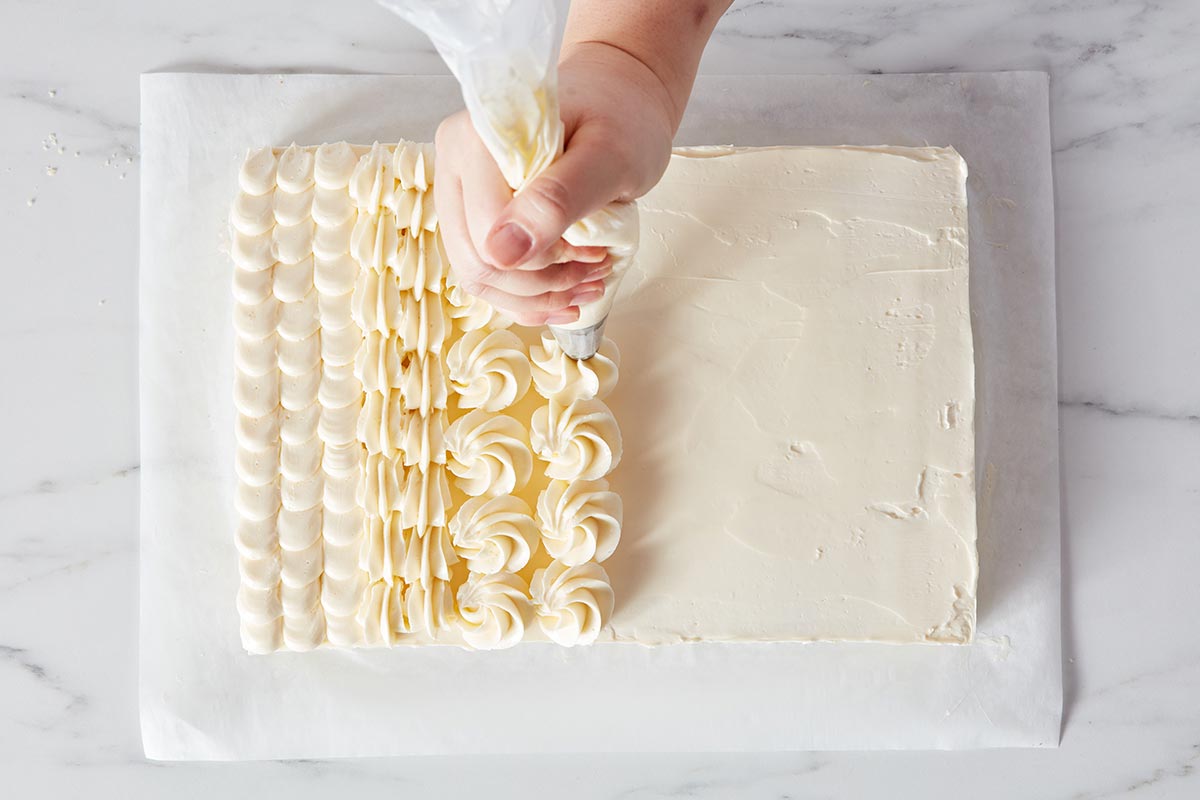
How to pipe a seashell border: Place the tip about 1/2" above the surface of the cake. Squeeze gently, without moving, until the frosting touches the cake. Continue squeezing as you move your hand up away from the cake a fraction, then down and toward yourself about 3/4". Without picking up the tip, repeat that motion from the beginning: blob, up, pull down and toward you (or around the edge of the cake). Once you get the rhythm it will become second nature.
Leaf tips can make ruffled borders and leaves, of course, but they can really dress up the sides or top of a cake with just a simple picket-fence technique that looks like a tuxedo stripe.

How to pipe a tuxedo stripe: This one is quite simple. Starting at the bottom of the cake (if frosting the side of a layer cake) or one end of the cake (if frosting a sheet cake), place the tip against the cake and squeeze evenly as you draw a straight line of frosting. Release the pressure once you get to the edge of the cake. You can either let the end frosting stand up a bit (it will look a little like the tip of a flame) or smooth it off later on to be flush with the rim of the cake. The tip will give you the pattern of a bead up the center and some edges that flare back a bit.

Repeat the process, drawing a line of frosting next to the one you just made over the full surface of the cake.
One last bit of advice: If you’re looking to up your frosting game, give yourself the gift of some time to practice on a piece of parchment paper before working on a cake. You can experiment to your heart’s content, screw things up, or invent new techniques, then scrape the frosting back into the bowl and try again. I recommend brushing up on these basic techniques for how to assemble and frost a cake to create your perfect canvas.
You’ve got the pastry bag skills down. Now what about the frosting? For a guide to different frostings and which to use for decorating, see our blog post A breakdown of (almost) every frosting.
Photos by Rick Holbrook
