


I’m a kneader. I love to get my hands in the dough, to fold it up and over and down into itself. I've been known to vigorously slap wet dough on the counter for many minutes to give it some order.
There’s a visceral joy in working bread dough, a therapeutic journey that starts with water and flour, and ends with a smooth dough and a reset attitude. But sometimes it’s nice to give it some distance, to go hands-off, to let your sourdough starter do the work. And in the end, a loaf of No-Knead Sourdough Bread will be just as enjoyable as one I not-so-gently transformed on the counter. I'll just have to find a different means for relaxing.
This recipe is as no-knead as it gets — it's no-fuss and no-worry. All you have to do is mix everything in the bowl (I like to use my hands here, lest they start to get too lazy), give the dough a few folds while it rises during bulk fermentation, and sit back to watch as it smooths out and strengthens over time. Then it's into the refrigerator for a cold overnight rise, and the next day the dough is ready — on your schedule — to shape, rise, and bake.
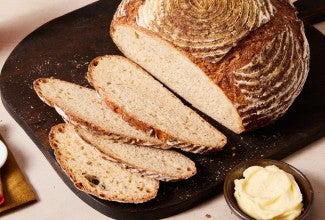
The result is a loaf with impressive volume, a mahogany crust, and a tight interior crumb that’s perfect for sandwiches or soups, and begs to be torn by hand at the dinner table.

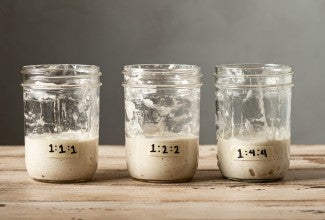
One of the most remarkable things about no-knead sourdough bread is how the dough transforms with only a little encouragement from the baker. It first begins with a sticky, shaggy mess just after mixing (upper-left image, above). Then you can see it begin to smooth out after the first set of stretch and folds in the upper-right image. Next, it starts to show signs of real strength and fermentation at lower-left, after the second set of stretch and folds. Finally, in the lower-right image from the next morning, the dough is smooth and well-risen, ready for pre-shaping. All without any kneading!
Let's get baking.

Let's start by gathering our ingredients:
Since this recipe uses no commercial yeast, it's important that you use ripe starter. To learn more about what that looks like, read our blog post: Ripe sourdough starter.
In a large mixing bowl, combine the ripe sourdough starter, water, flour, salt, and the optional diastatic malt powder. (I didn't use any malt powder in the loaves pictured here.) Mix the ingredients together using wet hands or a dough whisk.
Cover the bowl and let the dough rise for 3 hours. During this bulk fermentation give the dough three sets of stretch-and-folds: once after the first hour, again after the second hour, and once more at the end of the 3 hours.

For each set of stretch-and-folds, use your wet hands to pick up the dough from the middle of the container or bowl, lift it about a foot high, then let one edge fold under to the center of the bowl. Rotate the bowl 180° and repeat a second time. Then rotate the bowl 90° to lift and fold one of the short sides. Finally, rotate the bowl 180° and fold the remaining side under. You should have a neatly organized ball of dough in the middle of the bowl. Cover the bowl and let the dough continue to rise.
After the third set of stretch-and-folds, cover the container and place it into the refrigerator for at least 8 hours or up to 48 hours (mine was in the refrigerator for 14 hours overnight).
When you’re ready to make bread, take the dough out of the fridge and scoop it onto a floured work surface. Preshape the dough into a round and let it rest for 30 minutes. During this time, the dough will warm up and start to expand outward on the work surface.
Ready your round proofing basket (or kitchen bowl lined with a tea towel) by lightly sprinkling on some unbleached all-purpose or bread flour or white rice flour to help prevent sticking. Alternatively, you can shape the dough following the instructions in the recipe if you want to make a long 13" loaf.
Lightly flour the top of the rested dough. Then use lightly floured hands and a bench knife (or dough scraper) to flip the dough over onto your work surface. The dough will feel strong and elastic and doesn’t need much shaping to keep it round.

As seen above, I chose to simply “gather up” the dough by grabbing opposite sides and folding them over toward the middle at the same time (like folding up a handkerchief to hold a package in the middle). After the four sides are brought to the center, flip the dough over and finish tightening the boule as necessary. See my guide to shaping a boule for tips on this method and others.
 Using your bench scraper (or tool of your choice), swiftly pick up the dough and place it into the proofing basket, seam-side up. Cover the basket with plastic wrap or a reusable cover and seal shut.

Let the dough rise for about 2 1/2 hours at room temperature. At the end of the proof, it should pass the “poke test” when it’s ready to bake: make an indentation with your finger and it will slowly — and not completely — spring back to the surface.
I baked this loaf in my combo cooker, but you could also use a Dutch oven (see King Arthur's post on baking with a Dutch oven). Preheat your oven with a Dutch oven inside to 500°F.
There are a lot of ways to score the dough and safely place it in the Dutch oven – this is my method. Cut a piece of parchment paper to fit over your proofing basket and place it on top after uncovering it. Then, place a pizza peel on top of the parchment to cover the proofing basket and flip the entire stack over. You should now have the dough on top of the parchment that’s on top of the pizza peel.

Using a sharp blade, or scissors, score the dough (see my dough scoring post for inspiration and instruction). Using oven-safe gloves, take out the preheated Dutch oven and slide the scored dough with parchment paper into the pot. (It’s OK to bake the loaf with the parchment paper inside the pot.) Return the pot to the oven and cover with the lid.
Reduce the oven temperature to 450°F and bake for 45 minutes, then remove the lid from the pot. Bake for an additional 10 to 15 minutes, until the crust is well colored and the internal temperature reads at least 210°F.
Once fully baked, remove the loaf from the oven and turn it out of the Dutch oven onto a rack to cool for at least an hour before slicing.

This loaf is delicious, with all the crunchy crust and creamy crumb of any of the others I've made — and it couldn't be easier. There's so much joy in getting your hands in bread dough to knead and work it until it's smooth and elastic. But I have to say, there's equally as much to be found in sitting back and witnessing a dough's transformation by giving it space and time to strengthen all on its own. It's amazing to watch and then delicious to eat.
Be sure to check out our other no-knead bread recipes. And for more great tips and techniques, head over to our Sourdough Baking Guide.


February 17, 2022 at 1:34pm
I want to buy a Banneton Brotform but don't know what size is appropriate for this recipe. Can you help?
February 23, 2022 at 10:51am
In reply to I want to buy a Banneton… by Guy (not verified)
We sure can, Guy! Our 9" banneton can hold doughs made with up to 5 cups of flour and since this recipe exceeds that amount you will want to scale up to at least a 10" banneton to be able to hold all of this dough sufficiently. Happy baking!
February 8, 2022 at 2:02pm
What would you recommend to make this whole wheat or 75% wheat/25% white? Even if doing it by weight, the dough would be more rigid. Should the water or starter increase?
February 18, 2022 at 9:32am
In reply to What would you recommend to… by Alex (not verified)
Hi Alex,
Yes, once you have the ins and outs of the recipe as is, then it's fine to start experimenting with incorporating other flours and grains. Starting with a small percent of whole wheat is a good approach, and you'll need extra liquid to as whole grains do absorb more, probably 20-40g per cup of whole grain flour used. Happy baking!
February 24, 2022 at 1:00pm
In reply to Hi Alex, Yes, once you have… by mrobbins
Thank you so much - I found the 20-40g per cup ratio to work very well to make a more flexible dough!
January 20, 2022 at 4:01pm
Hi,
What is the hydration of this recipe if using 50/50 sourdough starter. Is it about 40%? How much water would I increase the hydration by to obtain about 60%. Can I do this with a recipe like this?
I love baking with you.
Thank you
January 23, 2022 at 2:34pm
In reply to Hi, What is the hydration… by Martha Souza (not verified)
Hi Martha, I'm not completely sure what you're asking, or what you mean by a 50/50 starter. The hydration of this recipe as written is about 71-72%, assuming you're using an 100% hydration starter (which is composed of 113g each of flour and water). Are you considered substituting a stiff starter, or a starter that is fed with half whole wheat flour and half all-purpose flour? For more efficient troubleshooting you might want to consider giving our Baker's Hotline a call at 855-371-2253. We're here M-F from 9am-9pm EST, and Saturday and Sunday from 9am-5pm EST. We'd love to help you figure this out!
January 20, 2022 at 3:12pm
If I’m using stoneware to bake my bread, do I have to preheat it too like a dutch oven? Also, do I need to adjust baking temperatures/timing?
January 23, 2022 at 1:25pm
In reply to If I’m using stoneware to… by Felix (not verified)
Hi Felix, it depends on the type of baking vessel you are working with, as some stoneware is suitable for preheating empty and some is not. Check the manufacturer's recommendations for the particular pot you're using. You shouldn't have to adjust the baking temperature, unless the recommended maximum baking temperature for your pot is less than the baking temperature the recipe specifies, in which case it's fine to lower the baking temperature a bit. If you're not able to preheat your pot empty, put the bread and pot into a preheated often and remove the lid after 25 minutes, and then continue baking until done (most likely another 20-25 minutes). If you allow the dough to rise in your pot for the shaped rise, be sure to grease your pot well, or line with greased parchment paper. This will help ensure that your bread releases easily after baking.
December 11, 2021 at 11:24am
The instructions say, "Alternatively, you can shape the dough following the instructions in the recipe if you want to make a long 13" loaf."
My question is, what recipe are you referring to? There isn't a link or anything to click on.