Keeping starter alive vs. getting it active
Remember, there's a difference between starter that's being fed simply to keep it alive; and starter that's being readied for baking.
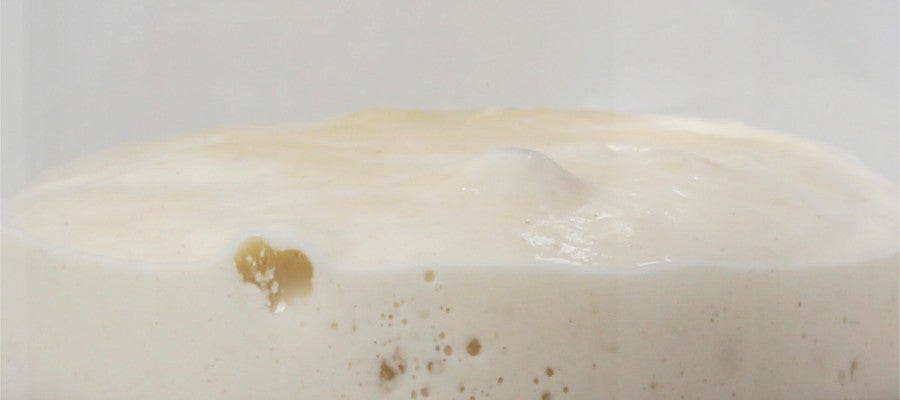
To create baking-ready starter, feed it until it doubles in size within 6 to 8 hours of being fed; and appears bubbly and vigorous, with a sharp, clean aroma. Measure out the amount called for in your recipe, retaining 113g for the future (and discarding any additional). Feed that 113g of retained starter before refrigerating.
So, how do you spot a ripe starter? When your starter has doubled in size; you see bubbles breaking on the surface, and it feels somewhat elastic to the touch, it's ready to bake with.
If you see some faint creases in the top; lots of foamy bubbles, and the starter's surface appears to be slightly concave rather than slightly domed, you'll know it's just barely past its prime. But don't let that stop you; it's still fine to bake with.
Ingredients
- Naturally Leavened Sourdough Bread
- 454g ripe (fed) sourdough starter
- 602g King Arthur Unbleached All-Purpose Flour
- 85g King Arthur Premium Whole Wheat Flour or White Whole Wheat Flour
- 397g room-temperature water
- 2 1/2 teaspoons salt
1. Make the dough
If you're measuring the sourdough starter using volume rather than weight, stir it down before measuring. Combine the starter, flours, and water (hold off on the salt) in a large bowl and mix well, until all of the flour is moistened and the dough has formed a cohesive mass. Add extra water or flour if needed to form a soft, sticky dough.
2. Autolyse
Cover the dough and let it rest for 20 minutes. This rest, known as an autolyse, allows the flour to absorb the water, which starts the dough's gluten formation, and makes it easier to knead.

3. Knead
After the rest, add the salt and knead the dough until it's smooth and supple, though still somewhat soft and tacky. When fully kneaded, place the dough back in the bowl, cover, and let it rise for 1 hour.
4. Fold
Give the dough a fold: Turn it out onto a floured surface and, using a bowl scraper or bench knife, fold it like a business letter. Turn the dough 90 degrees. Gently flatten it a bit, and repeat the letter fold. Return the dough to the bowl, cover, and let it rise for another hour.
5. Pre-Shape
At the end of the rise, turn the dough out onto a lightly floured surface and divide it in half. Gently shape into two rounds, cover, and let rest for 20 minutes.
Pre-shaping dough creates the basic shape the loaf will eventually be, without refining that shape. Why pre-shape? Any time you handle dough its gluten tightens up, making it more resistant to further shaping. Pre-shaping dough then letting it rest before its final shaping relaxes its gluten, making it much easier to shape into its final form.
6. Shape into a boule
After this rest, shape the loaves into tight rounds, and place them seam side up in bowls lined with floured cloth, or on a cloth couche. Cover and let rise until light and airy, about 2 to 2 1/2 hours.
7. Prepare your oven
About 60 minutes before the bread is ready to bake, preheat the oven with a baking stone in it (if you have a stone) to 450°F. For the best crust, place an empty cast iron frying pan on the oven rack below the stone to preheat.

8. Score
When the loaves are risen, gently turn them out of their bowls onto parchment and slash them with a sharp knife or lame. If you're not using a baking stone, turn them out onto a parchment-lined (or lightly greased) baking sheet and slash them.
Scoring (a.k.a. slashing) a risen loaf just before putting it into the oven helps it retain its shape by giving it a pre-designated spot — the slash — to expand. Without scoring, bread may bulge, or "blow out" its side or top, creating a misshapen loaf. Scoring can be a simple series of straight-line cuts made with a baker's lame, razor, or sharp knife; or it may be both intricate and decorative.
9. Steam
Slide the parchment directly onto the stone in the oven. If you're not using a stone, place the baking sheet in the oven. Pour 1 cup of boiling water into the cast iron frying pan. Be sure to wear good oven mitts to prevent steam burns.
Adding steam during baking is critical to the final look and taste of your bread. Steam doesn't just enable a great rise in the oven, and help develop a beautiful, crackly crust. It also promotes an open crumb structure, as well as rich flavor and color. See our blog post, Steam in Bread Baking.
10. Bake
Bake the bread until it's crusty and golden, about 35 to 40 minutes. Remove the loaves from the oven and cool on a rack before slicing.

Next: Maintain
Now that you’ve successfully created your starter, you need to feed it regularly to keep it alive and active.
Get started


