


A guide to bannetons, brotforms, and proofing baskets
Navigating these beloved bread tools and how to use them in the kitchen.
Walk into any professional bread bakery and you’ll find sky-high stacks of bannetons somewhere, guaranteed. These baskets are staples for bread bakers, who use them to cradle dough as it proofs. But are they a necessary tool for a home bread baker?
Bannetons and other proofing baskets (sometimes called brotforms), are used to hold shaped bread dough as it rises. They help the dough maintain its shape, which is particularly helpful if it’s a wet, high-hydration dough that, without the support of the basket, might otherwise flatten into a pancake. With the sides of the basket providing support, the dough will rise upwards, instead of outwards.
Using a flour-dusted basket, either with a liner or without, also allows you to more easily move dough without sticking or tearing (which can cause your dough to deflate and your bread to turn out flat). Once the dough is done proofing, it’s flipped out of the basket and onto the baking surface (or into the baking vessel) to be baked.

Not at all. They’re common for sourdough breads because these styles are typically baked as boules or bâtards, the loaf shapes that need a proofing basket for support as they undergo their final rise. But plenty of non-sourdough breads (“straight” breads) can be baked in this shape and thus need a proofing basket, such as this Artisan Hearth Bread.
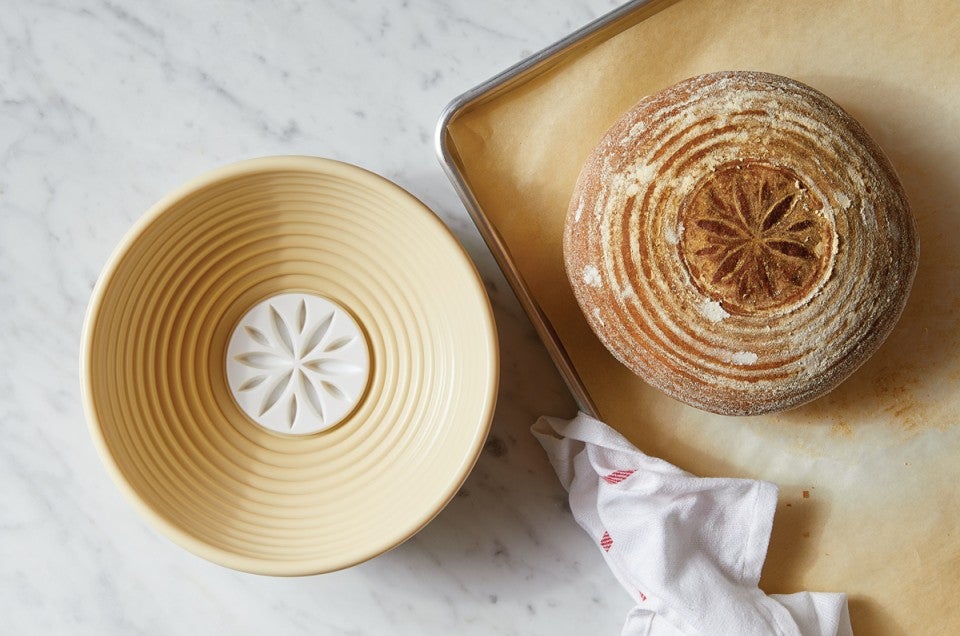
Both bannetons and brotforms are European proofing baskets meant for artisan-style bread-baking, and they can be used interchangeably. (The terms are sometimes used interchangeably too.) “Banneton” is the French name for such baskets, while “brotform” is German. They’re frequently made from cane, but some baskets are made of wood pulp, willow, and other materials. There are other types of proofing baskets that perform the same function, like our plastic proofing basket with ringed lines that mimic a basket’s coiled shape.

It depends on the shape of bread you want to make, as the basket will determine the shape of the final loaf.
You’ll typically find bannetons and brotforms in either a round or oval shape, and in a few different sizes. The round shape is for boules, or circular loaves. The oval shape is used to make a bâtard, or an elongated oblong loaf. If you typically bake your bread in a Dutch oven, a round banneton is the best choice, as the loaves fit into the pot’s circular shape. But having both is handy so you can make any shape of bread.

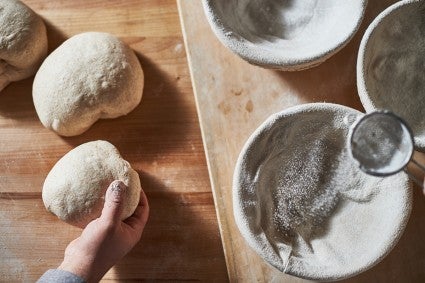
First, prepare the banneton, brotform, or whatever proofing basket you’re using. If it has a cloth liner, add that to the basket. Lightly but thoroughly dust the basket (either the cloth lining or the basket itself, whatever surface the dough will be touching) with flour. Our Baking School recommends using a sifter so you get a nice even layer of flour. Shake out any excess.
Shape your dough to fit the basket: a boule for round proofing baskets and a bâtard for oval proofing baskets.
Place the dough in the basket with the seam side facing up. Cover the basket and allow the dough to proof according to the recipe’s instructions. A lot of bakers like to use a shower cap to cover their dough, as the elastic clings easily to the sides of the basket. A proper bowl cover is another great choice.
Once ready to bake, carefully invert the basket and turn out the dough.
Yes! Even if you have a cloth liner (which is typically used for bannetons), you’ll still want to dust it with a light layer of flour to prevent sticking.
“Not sticking begins with shaping,” says King Arthur Baking Ambassador Martin Philip. “Gentle shaping helps prevent sticking due to the avoidance of rips or tears, which expose a sticky subsurface.”
Martin also recommends dusting your basket or banneton with a light but thorough layer of flour. Any flour will do, from all-purpose flour to bread flour to whole wheat flour. That said, many bread bakers like to choose a coarse flour that will create a more noticeable barrier between the dough and basket and won’t incorporate into the dough itself. Common choices include semolina flour or rice flour. In addition, “whole grain flours with their inclusion of bran do better to release dough from the proofing vessel than white flour,” notes Martin.
One nifty trick is to use a hairnet (yes, a hairnet!) to line your proofing basket for extra insurance. These hairnets are a good choice.
Despite your best precautions, your dough may still stick to your proofing basket, especially if it’s an extremely wet dough or if your basket is still fairly new and hasn’t built up a thin layer of flour to prevent sticking. (It’s happened to me, and it’s not fun.)
If this happens, Martin recommends a practice from his days in a professional bakery: Invert bannetons onto a sheet of parchment. Within a few minutes (five or so) the doughs will often slowly release, thanks to gravity.
For more fully adhered situations, bakers may gently try to release the loaves, working from the side, as gently as possible. “In this process, the loaves are often deflated,” notes Martin. “In that case, a little extra oven heat and a little less steam can help get the best result possible from your bake.”

If you don’t have a banneton or brotform, a common substitute is a bowl lined with a flour-dusted lint-free kitchen towel. This will work in a pinch, but it doesn’t have the same benefits of a proper banneton or brotform. These baskets are just the right size and shape, and liners fit perfectly without a ton of overhang (which can make lining the bowl cumbersome). And note, this only works for round loaves, not ones that are oval-shaped.
Bottom line: If you’re doing more than an occasional amount of bread baking, it’s worth having a proper proofing basket in your kitchen.

Your proofing basket doesn’t require a lot of maintenance. Simply shake the excess flour out after each use. If a bit of dough has stuck to it, wait until it dries, then use a stiff brush to take it off. Keeping a little bit of flour helps the basket build up a lining, like seasoning a cast iron pan, that helps prevent future sticking down the line.
If your liner is separate from your basket, the same rules apply: Shake it out, don’t wash it. The liners can be stored in a zip-top bag in your freezer, which will prevent them from developing a musty smell.
If for some reason you need to clean your basket, use a stiff brush and warm water (no soap), and allow it to completely dry at room temperature.
If you’re ready to upgrade your baking, we offer several types of baskets: a round brotform, oval broform, and round proofing basket.
Cover photo by Kristen Teig; food styling by Liz Neily.


November 19, 2024 at 5:13pm
Are proofing baskets ever used with enriched dough (one that has eggs, butter, and milk)?
November 19, 2024 at 5:42pm
In reply to Are proofing baskets ever… by RC (not verified)
Hi RC! You could certainly use a proofing basket for an enriched dough, though these doughs are often traditionally baked in pans so that there is not a need for a proofing basket. Happy baking!
November 20, 2024 at 10:58am
In reply to Hi RC! You could certainly… by ablume
Thanks! Your explanation makes a lot of sense. I was wondering why I never see them in proofing baskets and thought there might be concern with the perishable ingredients. I'm making the sourdough pumpkin-shaped loaf from this site and wondered if it would work to put it in a proofing basket.
November 30, 2024 at 2:28pm
In reply to Thanks! Your explanation… by RC (not verified)
Yes, a proofing basket should work fine for the Sourdough Ginger Pumpkin Bread recipe, although you'll want to be sure to flour the basket well to prevent sticking, and brush out any dough residue lingering on the basket after it has been allowed to dry thoroughly.
August 21, 2024 at 10:32am
Above you say not to wash the cloth liner. I just bought mine and feel uncomfortable using it without washing it for the first time. Is this ok, and then don’t wash it once I start baking?
August 21, 2024 at 10:44am
In reply to Above you say not to wash… by Kim (not verified)
Hi Kim! If you'd like to wash it before use, that is okay but once you begin using it, washing it will compromise the seasoning on it so we don't recommend it. Happy baking!
November 18, 2024 at 8:55am
In reply to Above you say not to wash… by Kim (not verified)
I wash "new" everything thing! Who knows how or by whom it had been handled.
December 3, 2024 at 3:16pm
In reply to Above you say not to wash… by Kim (not verified)
I rinsed my basket with Lukewarm water and sat it upside down on a mason jar to dry. I washed my liner with Lukewarm water and a couple of drops of soap. Then I let them air dry. The next day I used rice flour on my basket and let a heavy amount set in it til the next day. Then I got all the lose flour out and they work great,no sticking at all.
July 2, 2024 at 12:53pm
Can I use an oiled ball of dough in a bannaton?
July 2, 2024 at 3:04pm
In reply to Can I use an oiled ball of… by Patti Gustin (not verified)
Hi Patti! For the longevity of your banneton and or liner, I would recommend against it. While oil could theoretically help with a clean release of your dough, white rice flour or semolina flour would be a bit easier and more cleanable method of ensuring a clean release on your banneton. Happy baking!