


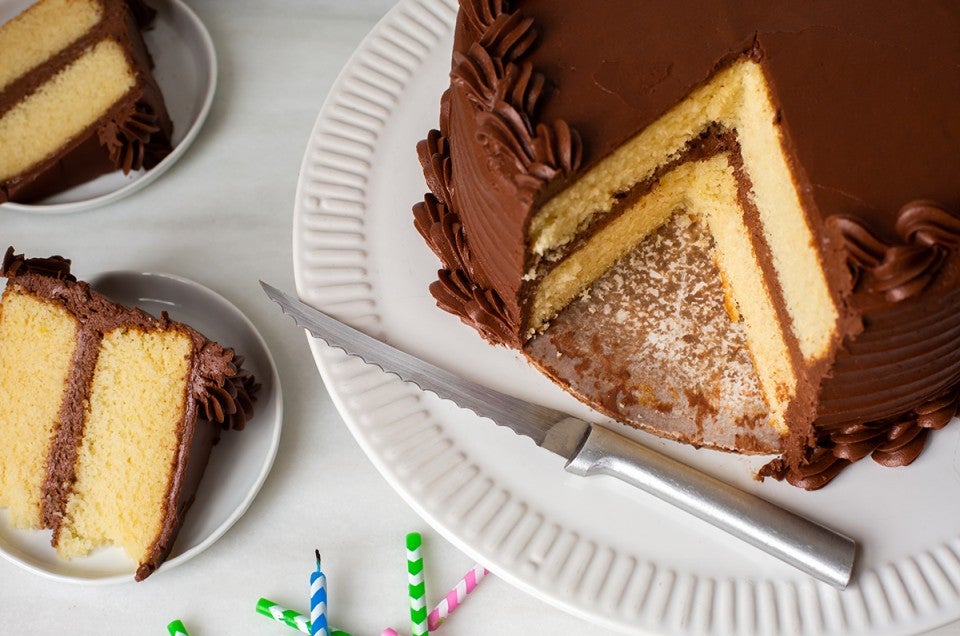
One of the most thrilling moments as a baker is pulling away the first slice of a towering layer cake. With any luck, the slice is gracefully removed to reveal the beautiful layers inside. But all too often, when you cut cake the slices end up smeared with frosting and smattered with crumbs. Here's how to cut a cake to achieve the former — and definitely not the latter!

Let’s start with the critical equipment for the job — the tools you need to cut cake slices cleanly.
If you cringe at the sight of haphazardly sliced cake, the tool you need is a tomato knife. Yes, it’s handy for thinly slicing fresh tomatoes. But its lesser known purpose? Cutting cake perfectly!
The first time I used this slender knife to slice our Classic Birthday Cake, I literally cried out with delight as I removed the first slice: not a crumb out of place!
The tomato knife is serrated with relatively wide teeth. It slices through frosting and cake layers without exerting much pressure. It’s also super sharp while having a narrow width and short depth. This makes it ideal for cutting cake; there’s not a lot of surface area for the knife to collect frosting and then drag it through the rest of the cake. It’s worth investing in this humbly priced knife — it’s the best tool to cut cake.

If you’re not able to get your hands on a tomato knife, you’ll want to use another relatively short serrated knife. A blade that’s about 5” to 8” is easiest to handle.
Some people might lean towards a straight-edged chef’s knife, thinking its sharp blade and typically long reach will do the job best.
Our testing taught us otherwise. We found serrated knives performed better than chef’s knives when cutting cake; they made neater slices with fewer frosting smears.
Another plus? With a serrated knife, you can use a gentle sawing motion so the knife moves through the cake without compressing each slice. With a chef’s knife, you might end up pushing downward and ending up with a dense, smushed slice of cake.
Still delicious, don’t get me wrong — just not quite as beautiful as you might have hoped.

Now that you’ve chosen the best knife for the job, let’s talk about some of the techniques you can use to cut cake perfectly.
Most people enjoy eating cake at room temperature. That said, don't be afraid to refrigerate your cake briefly before slicing. A quick chill in the fridge for about 10 to 15 minutes will help set your cake's frosting. The slightly cold frosting is less likely to smear as you slice a knife through it.
You won't be serving cold cake — this is a brief enough rest that the cake won’t become chilled all the way through. Plus, the cake slices will warm up quickly once they’re plated. If you really want to make sure the slices have lost their chill, wait about 5 minutes after the slices are plated before serving.
If you have time to chill your cake before cutting, you can make slicing even easier by running your knife under hot water before using. Be sure to dry the knife thoroughly, then cut your slices while the knife is still slightly warm to the touch.
The warm knife will cut through the frosting like butter! The slices will be neat and clean, leaving all the frosting exactly where it's supposed to be.

Regardless of whether you’ve chilled your cake or warmed up your knife, be sure to wipe the knife clean between slices. It’s normal for the knife to collect frosting and crumbs as you cut cake (even a tomato knife to a degree). But your knife is more likely to snag and smear if you let the frosting build up.
Use a kitchen towel or sponge to wipe the knife clean after each slice. Then watch your knife move through the cake without a hitch!

You know which knife to use and the techniques to make the best slices — now we’ll show you a few tricks that are worth having up your sleeve.
If you’ve ever heard about using dental floss to slice cinnamon rolls or cheesecake, this trick won't surprise you. It turns out that strong, thin floss, or in this case, fishing line is a fantastic tool to slice through cake cleanly.
Use clean, sturdy fishing line, and be sure to cut yourself a piece that's long enough. (It should be at least as long as the diameter of the cake plus 4", approximately.)
Before cutting your cake, make light marks in the frosting to serve as guidelines for the slices. This ensures you'll end up with the right amount of evenly cut slices.

Once you’re ready to cut, hold the line firmly in each hand. Keeping it taut, exert downward pressure with your thumbs to bring the line all the way through the cake. Once you’ve reached the bottom, simply let go with one hand and pull the line out the other side of the cake. Wipe the line clean if it’s collected some frosting before making the next cut.

Sometimes you’ll have chosen the right tool and made your cuts as mindfully as possible, and you still end up with frosting smears or errant crumbs. In these cases, relax! Your cake will still taste scrumptious, frosting smudges and all.
But if you’re a type A baker (like I am) you might want to invest in some tweezers for the kitchen. They come in handy if you’re determined to end up with picture-perfect slices. Pluck out any frosting-stained crumbs or bits of cake that are out of place until you're satisfied.

An easier (and potentially a more delicious) option? Pull out some ice cream or whipped cream and serve your cake à la mode! Your guests will be so busy savoring the multilayered dessert, they won’t even notice a crumb out of place.
Whether you've made our Recipe of the Year (Classic Birthday Cake) or another impressive layer cake, slice it like a pro using our tips.
Remember to use a small, sharp serrated knife and a gentle sawing motion. Chill your cake if you have time, then warm up your knife and wipe it clean between slices. You've got tricks to use if needed.
Cut your next cake with confidence, and you'll hear oohs and ahhs as you pull away the first slice. The layers of cake will look pristine, and the filling and frosting will obediently stay in place.

Share a picture of your next cake (and those impeccable slices) with us on Instagram or Facebook using #kingarthurbaking. We'd love to see what you bake!
If you have other cake slicing techniques in your culinary toolbox, share them in the comments, below.
Thanks to Jenn Bakos for taking the photographs for this post.


February 6, 2023 at 2:18pm
There is an internet trend to slice layer cakes holding the knife vertically instead of horizontally, and slicing into the side of the cake instead of the top. The idea is that when you cut vertically, and the inevitable smearing of filling and crumbs occur, the filling smears along a horizontal filling layer, and the crumbs spread into the horizontal crumb layer. The result is a clean-looking cut. (As opposed to the traditional horizontal cut, where the filling layer smears into the crumb layer, and the crumbs smear into the filling layer, and the result is unsightly.)
Any thoughts? Have you tested this method?
May 14, 2024 at 9:29pm
In reply to There is an internet trend… by Mike Kassarjian (not verified)
I've found the cutting method you describe works extremely well with cream filled cakes like prinsesstårta. I was astonished how much nicer my slices looked when I cut from the outside-in rather than from the top-down.
January 10, 2022 at 9:30am
I must have misunderstood the title to this article. I thought that it would also contain different ways to slice a cake, especially a round cake one. However, I do like the idea of using the serrated knife, and the tip listed in the comments to use a plastic serrated knife to slice brownies. I still found the article interesting, though.
November 21, 2020 at 12:59pm
What happened to your tomato knife? You show it in the picture. I have two and love them I wanted another.
November 24, 2020 at 2:40pm
In reply to What happened to your tomato… by Angela (not verified)
Hi there, Angela! We're glad to hear that you've been enjoying the knives you got from our site! At this time we're not currently carrying that item.
February 22, 2023 at 10:20am
In reply to What happened to your tomato… by Angela (not verified)
Having lost my KA Tomato knife during a move, I found Pampered Chef has a fairly nice one on their site. I have had one for quite a few years now and it works well.
October 3, 2019 at 7:15pm
when I use a 9/11 or 9/13 pan the cake rises too much in the middle making the layers uneven when I try to stack them
October 4, 2019 at 10:07am
In reply to when I use a 9/11 or 9/13… by michele mckee (not verified)
Hi Michele! That happens because the edges of the pan bake the sides of the cake quickly and the middle takes longer and continues to rise. Glass pans cause this to happen more dramatically than light-colored metal pans do so if you can use metal pans you'll have flatter cakes. You can also wrap the pans with cake strips to insulate them, though commercial cake strips might not reach all the way around a pan that size. You can make your own cake strips by fully wrapping damp paper towel strips in tin foil and then wrapping that around the edge of the pan.
February 22, 2023 at 10:28am
In reply to when I use a 9/11 or 9/13… by michele mckee (not verified)
As a professional baker, I was taught many years ago to level a cake using a clean kitchen towel.
Immediately after taking the cake from the oven and while it is still hot and in the cake pan, gently press down on the middle of the cake layer (while still in the pan) with the folded clean towel. It takes very little effort so don't press hard. This will even out the cake layers nicely and works every time. Additionally, there is no cake waste. Be careful not to burn your hands on the side of the pan as you are pushing, however!
September 6, 2023 at 6:46pm
In reply to As a professional baker, I… by Bettina Halpern (not verified)
This is brilliant. Thanks!