


How to make a cornet and never go without decorated cookies
All you need is a piece of parchment paper.

The best long-term relationships are the ones that grow and evolve over time. Just when you thought you knew everything about a person, they come along with some surprising new personality quirk that makes you love them even more.
I thought I had a great relationship with parchment paper. We were steady, if a little stale — always protecting my half sheet pans for minimal cleanup and lining my cake pans to ensure an easy release. I knew what this trusty workhorse gave me, and I loved it for that.
After decades of camaraderie, however, parchment paper and I are now spicing things up in the kitchen.
That’s because, thanks to the talented bakers at the King Arthur bakery, I’ve learned how easy it is to make a cornet out of parchment, and now I can decorate just about any baked good with ease.
A cornet is a small cone made from parchment paper that’s used to pipe fine lines of glaze, icing, or melted chocolate to decorate baked goods.
According to Jackie Tissiere, one of King Arthur's pastry bakers, “The advantage to the cornet is efficiency. We often don’t have small piping bags, just big ones. The cornet is nice because you can make fine lines and write little things with it, as opposed to having a giant pastry bag to try and wield. We always keep some filled with chocolate just hanging around the bakery, ready to use anytime.” Kristen Fenn, another King Arthur baker, likes them for their “fine detail, whether writing on a cake or making delicate decorations on cookies.”
Another benefit: You can make detailed designs without having to keep a tiny piping tip lying around (something I don’t typically keep in my kitchen, and other home bakers may not either).
To master the cornet, I asked Jackie to walk me through the process. Here's a guide on how to do it:

Start with a rectangle or a square of parchment paper. Cut it from one corner across to the opposite corner to make a triangle.
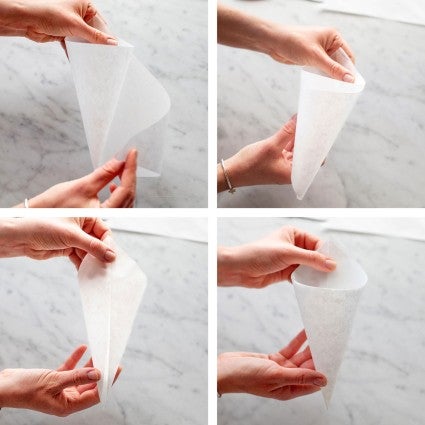
To make a cone shape, take the two corners at the bottom of the triangle and roll them into the center to form a cone shape. The “tip” will be at the center of the long end (hypotenuse) of the triangle. You’re going to have one corner on the inside and one on the outside, but that straight line where you cut should roughly meet up in the back.
Shift the folded edges of the parchment around a little bit until you get a nice taut point at the bottom of the cone you’ve made — there should be no holes or gaps.

Once the cone feels sturdy and stable, take the corners sticking out above the open end of the cone and fold them into the cornet. That keeps everything from coming apart as you’re piping.
The cone is pretty much sealed at the bottom until you cut off the tip, allowing you to fill the cone neatly before cutting it.

A cornet is easy to overfill because it's so small. Only fill it about halfway with glaze or chocolate; because you’ll be folding down the open end of the cone to close it, you want ample room there.

Flatten the top of the cornet. Then fold both corners into the center, almost as if you were wrapping a present.
Next, fold the top down in a rolling motion, until you’re up against the filling. The folded end should be nice and secure so that the filling won’t come out the top.
When snipping the opening to pipe, always start small. You can cut a little more off, but once you’ve cut too big a hole, you’re stuck. Make a small snip, then try it out by piping a little on a spare piece of parchment. If you like the size, great! If the filling isn’t coming out the way you want, cut a little more.
If you’re finding your chocolate or icing isn’t coming out smoothly, or you need to put a lot of pressure on the bag to pipe, try cutting your hole a little bigger. It’ll help you get a more fluid, even line.

Because it’s smaller than a regular piping bag, a cornet can be a bit odd to handle. Hold it almost like you would a pencil if you were going to write with it. The entire bag is held in one hand, with the folds snuggled up under the thumb, and the thumb controlling the flow.
To pipe, put pressure at the top, right where the filling is, so that you can draw a line.
Chocolate is nice because it flows easily — you don’t need to put much pressure on the cornet itself. For icing or something a little stiffer, you’ll need to squeeze harder on the cornet to get it out.
The only downside to the cornet is that you can’t really refill it. It gets messy, so these are typically a single-use item. If you go through all of your chocolate or glaze, just make another one rather than try to refill.
This simple piping tool can be used to add detailed decorations to any number of baked goods: celebratory writing on a birthday cake, marbled chocolate lines on the top of a Napoleon, or even an artful drizzle of glaze on scones.

One particularly great application is cookies. You can use a cornet filled with Royal Icing to pipe and flood a cookie — in other words, pipe an outline of icing around the edge of the cookie, let it set, then completely fill with icing for a smooth decorating surface.

Next, use a cornet to add artful touches like lines or dots. (Check out our blog post on cookie decorating techniques for tips.)
You can make more detailed designs if you’d like. That said, one of the great things about decorating with the fine tip of a cornet is that even the simplest additions, like polka dots, can create professional-looking cookies.
If you’re ready to make some stunning cookies this season, get started with our Holiday Butter Cookies, Royal Icing, and of course, parchment paper.
Cover photo by Jenn Bakos.


December 5, 2021 at 2:05pm
Thank you for this handy tutorial. This will make things much easier for me this year.!
December 5, 2021 at 4:59pm
In reply to Thank you for this handy… by Lenora (not verified)
You're very welcome, Lenora!
December 5, 2021 at 1:35pm
This was always a challenge for me until I watched the Wilton baking video on YouTube on how to fold a cornet! I highly recommend watching it.
I am more of a visual person than reading step-by-step instructions and attempting to execute them.
December 5, 2021 at 5:01pm
In reply to This was always a challenge… by Ahn Lee (not verified)
Thanks for the recommendation, Ahn Lee!
December 2, 2021 at 8:26pm
Help! Cornet instructions confusing! What size parchment paper did you start with. 3 of us fools sat in the kitchen trying to make the cornet to no avail! Our guess is the size we started with? Thanks so much, they would be a huge help being able to small bags and better dexterity for a newbie.
December 3, 2021 at 4:07pm
In reply to Help! Cornet instructions… by Ellen Starkey (not verified)
Hi Ellen, if you have our parchment paper sheets, these sheets measure 16½" x 12¼." I would start by folding one of the short sides over so it lines up perfectly with the long side, forming a triangle where the two sides of the triangle that are equal are 12¼" and the long side is about 16½." If you cut off the remaining strip of parchement paper and open up your triangle you should have a nice square, which you can cut in half to make two cornets. The part that I found a bit tricky in the directions was this:
To make a cone shape, take the two corners at the bottom of the triangle and roll them into the center to form a cone shape. The “tip” will be at the center of the long end (hypotenuse) of the triangle. You’re going to have one corner on the inside and one on the outside, but that straight line where you cut should roughly meet up in the back.
It helped me to realize that the two corners that are folding inward need to overlap and meet up in the back, with one corner on the inside and one on the outside. This is a tighter cone than I originally imagined, but once I figured this out, then it all came together and made sense.
I hope this helps!
December 4, 2021 at 6:37am
In reply to Hi Ellen, if you have our… by balpern
I have been so consumed with getting this I even had a dream about how to do the folding! 🤣. This explanation and also watching the KA video from last year will help….can’t wait to try. Thank you