


Is it a good idea to make pie crust using a stand mixer? Or is it really better to combine all of the ingredients — the flour and salt, fat and water — by hand?
The vast majority of pie crust recipes (including those here on our recipe site) direct you to combine the dry ingredients, then work the fat in using a pastry blender, pastry fork, two knives, or your hands.
As far as using one of your handy countertop appliances, some folks say you can make pie crust using a food processor. But never will you see anyone espousing the use of a stand mixer (or electric hand mixer) to make pie crust.
Why is that? We use our trusty stand mixers for everything from brownie batter to bread dough — why not pie crust?
Some say a mixer toughens crust. Others say it doesn't flatten the fat in just the right way. And for some, I think it's simply resistance to change: Great-Grandma didn't use a mixer, and neither do I!
Well, I'm going to tell you a little secret: I've been using my stand mixer to make pie crust for years. Nay, decades, ever since I got my first mixer by saving S&H Green Stamps (and if you know what those are, you know how long ago that was!).
Truthfully, you may get marginally flakier pie crust by flattening each little piece of cold butter by hand as you work it into the flour. But these days, my aging hands, wrists, and shoulders — to say nothing of my patience — are sorely tried by the process.
I've used a stand mixer to make pie crust forever, and people have always raved about my crust. And I believe that using a stand mixer to make pie crust is a perfectly reasonable solution for those who don't want to work fat and flour together by hand.
Can you make pie crust using a stand mixer? Yes indeed — and here's how.
I'm using our recipe for Classic Double Pie Crust here, which combines both butter and shortening. The recipe yields crust with a textural combination of tender shortbread and flaky croissant — with a generous measure of crispness thrown in.

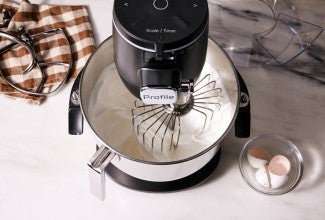
I put 2 1/2 cups (10 1/2 ounces) King Arthur Unbleached All-Purpose Flour, 1 1/4 teaspoons salt, and 1/4 cup vegetable shortening into the bowl of my stand mixer. I then use the beater attachment at speed 2 to create an evenly crumbly mixture. (I've poured the mixture out onto a piece of parchment so you can see it clearly.)
This first step, thoroughly combining shortening with flour, is what produces a tender crust. Fat coats the flour, which helps prevent gluten from forming strong bonds. When you cut into your baked crust, it breaks easily — which registers as "tender."

This recipe uses 10 tablespoons of unsalted butter. A baker's bench knife is very handy here. These butter cubes will separate from one another as you mix them into the flour.

Beat on a low setting (speed 2) until the mixture is unevenly crumbly. That's unevenly crumbly: you want dime-sized chunks of butter to remain unmixed.

Like this.

The recipe I'm following calls for 6 to 10 tablespoons of water. However much water your recipe calls for, don't add it all at once; drizzle it in slowly. When you see the mixture start to form larger clumps, stop adding water (and stop the mixer).

Grab a handful of the crumbs and squeeze. Do they hold together? If not, continue to drizzle with water until the dough is cohesive when squeezed.

When that happens, you're ready to add enough of the remaining water to make a crust that comes together nicely, without any crumbs remaining in the bottom of the bowl. Stop the mixer — you're done!

Gather the pastry into a ball and transfer it to your work surface. I like to work on parchment; it makes cleanup super-easy.

Shape the cohesive dough into two disks. For a double-crust pie, one disk should be about twice as large as the other. The larger piece will be the bottom crust, the smaller one the top crust.

Refrigerate for 30 minutes or so, and you're ready to roll. This short chill lets the flour absorb the water, as mentioned above, and solidifies the fats, making the crust a bit easier to roll.
See that white patch in the photo? That's a flattened piece of butter, and that's exactly what you want to see in your unbaked crust: flat chunks of butter, big and small. These butter chunks will translate to flakiness as the pie bakes.
So at the end of the day, how do you know if it's really OK to make pie crust using a stand mixer?

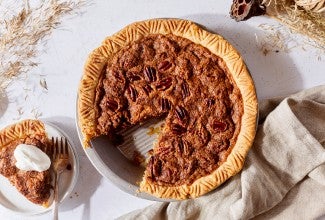
The proof is in the pudding — er, pie!
I'm betting there aren't many who'd turn down this slice of Apple Pie, made with the crust you saw prepared above.
Now remember, there's no such thing as baking police; if you've always made your wonderfully flaky and delicious pie crust using a pastry blender, food processor, or your hands, keep on keeping on. If your pie crust prep ain't broke – don't fix it!
But if you hesitate to make pie crust because you're unsure of your hand-blending technique, or your arms and hands can't take it, or you simply love the convenience of your electric mixer — go for it. Put away that pastry fork for good — no one will ever be the wiser!
Ready to put that pie crust to use? Browse our extensive collection of pie recipes for some baking inspiration.


November 2, 2021 at 12:56pm
In reply to I’m so happy to read this… by Nancy Linkov (not verified)
Hi Nancy! We haven't tried this in a mix master but speed 2 should work well for you to try this out. Happy baking!
September 28, 2021 at 5:09pm
Thank you PJ! This works like a dream. Always mixed by hand as taught by my Mom (pie maker extraordinaire!) For some reason I could never get the water addition correct. Your photos and tips made it so easy to know when to stop adding. Dough was so easy to work with. I just purchased an apple peeler to help me attack a backyard tree full of apples. This new method will make filling my freezer with apple pies waiting to be baked so much easier!
November 1, 2021 at 4:40pm
In reply to Thank you PJ! This works… by Sue (not verified)
Kitchenaid now has a new paddle for use with the mixer! Made specially to cut the fat into pastry dough. Just received mine recently. The attachment is the same shape as the regular paddle but has a series of horizontal bars within it.
November 2, 2021 at 10:01pm
In reply to Kitchenaid now has a new… by G. McCabe (not verified)
If that is not a flex beater, what is it called? Where can you order one?
November 3, 2021 at 2:02pm
In reply to If that is not a flex beater… by Susan H (not verified)
Hi Susan! This is called a pastry beater and can be purchased directly from Kitchen-Aid here. Happy baking!
November 11, 2021 at 9:02pm
In reply to If that is not a flex beater… by Susan H (not verified)
It’s a Pastry paddle, they have it on their website.
July 9, 2021 at 10:49pm
At 7,500 feet in Colorado, both the Classic Double Pie Crust and the stand mixer method were absolute winners! As a young girl, I learned to make pie crust using a hand pastry blender, then as a young mom stepped to the efficiency of the food processor method which has carried me nearly 40 years. Until today - skeptical of the method at first, but as I watched the dough come together just as described I was intrigued. Baked a blueberry plumcot balsamic pie with a wide strip lattice crust for my future DIL's bridal shower and the pie was perfect in workability, texture, flavor ... and curb appeal! The ease of this method will bring more pies to our family gatherings - thanks, PJ for sharing!
July 10, 2021 at 9:39am
In reply to At 7,500 feet in Colorado,… by Leann (not verified)
We're glad to hear this technique worked well for you, Leann, and we're sure your family will be overjoyed to reap the benefits of your increase in pie production!
June 20, 2021 at 12:32pm
I’ve had great success with this recipe and it is my go to for all pies I make. Today the crust I made has no elasticity, it rolls out great but when moving it to the pie plate it breaks apart-it is almost too flaky before being baked! What went wrong?
June 21, 2021 at 4:32pm
In reply to I’ve had great success with… by Amy Shopland (not verified)
We're sorry to hear that, Amy! Could it be that the butter chunks needed to be cut into the flour just a bit more? Another reason pie dough can crumble or crack is that it needed just a touch more liquid to hold everything together, usually, just a tablespoon or so will do the trick. We hope this can help for future baking adventures!