


With a blade in hand and a shaped round of dough on the workbench, bakers have an unexpected blank canvas before them. First and foremost, scoring bread dough with decorative cuts serves an important purpose: it guides a loaf to rise in a consistent, controlled, and optimal manner. But from there, let your creativity run free. As the old saying goes: we eat first with our eyes.
A single or double slash promotes a large opening but a series of small, delicate slashes creates a more intricate design. Stars, leaves, flowers, geometric shapes of all kinds — when utilizing the correct scoring implement (see my last post on scoring implements and general techniques), creativity has no bounds.
I recently attended a week-long baking workshop and after spending the good part of two days hands-deep in dough — admittedly, my favorite part — everyone seemed most excited to score dough. As we lined up in front of our loaves-to-be the wide grins were hard to ignore. There’s satisfaction in cutting dough you’ve spent time coercing from nascency to maturity, like a painter’s first brushstrokes on an all-white canvas brimming with potential.
In this post, we’ll look at various scoring techniques using my Fresh-Milled Spelt Sourdough Bread recipe. Each technique listed below is merely a starting point, a springboard for you to invent your own personal mark. But first, let’s talk about how to set the stage and prepare the dough for scoring.

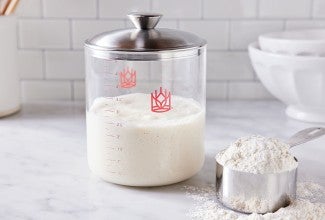
Dusting the top of your loaves with flour prior to scoring will ensure maximum contrast between white flour and dark, baked crust. I prefer to use a mixture of 50% white rice flour and 50% all-purpose flour. White rice flour has a higher scorch temperature that helps it retain a stark white color, even after prolonged time in the oven. I add 50% all-purpose flour because I do like scattered color, but if you prefer an all-white surface, go with 100% white rice flour.
First, turn your proofed dough from its proofing basket out onto a piece of parchment paper or (carefully) into a preheated baking vessel. The top of the dough might have flour from the basket; brush off the flour gently so only an even layer remains.
Using a fine-mesh sieve filled with the dusting flour, hold it above the dough and tap the side as you move around to evenly coat the surface. Be light with dusting as too much flour can quickly cake on the dough, transforming it from blank canvas to messy chalkboard.
At this point, the dough is ready for you to score and bake.
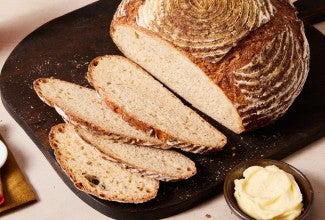
The key to success in each of the designs below is to score deep enough to cut through the skin of the dough formed during shaping, but not so deep that structural integrity is compromised. Note that a single and double slash do require a little more scoring depth, but the others should just break the surface so you see the interior of the dough, with the outside slowly splaying open.

When finished, take a look at the design. Are there any spots that don’t look like they’re cut sufficiently deep? If so, lightly run the lame (blade) over the same cut line again to ensure spreading in the oven.

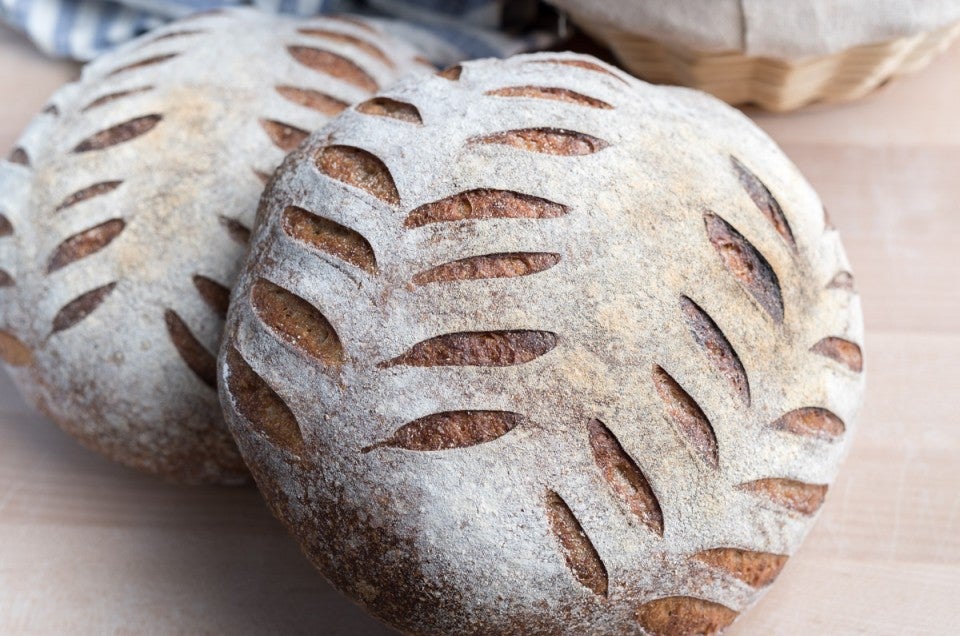
This design is one of my favorites for boules: a series of small cuts along the sides intended to emulate leaves or wheat stalks. The size and number are up to you, but I prefer larger cuts spaced regularly.

The preferred scoring implement for this design is a straight blade. A straight blade cuts straight into the dough at a 90° angle, perfect for the straight cut for each leaf.
Start at the top of the round (the side farthest from you) and begin making diagonal slashes in series from top to bottom. I like to add a gentle curve as the cuts progress from top to bottom; this curved set looks nice when the loaf expands up and outward in the oven. Then, repeat for the other side of the stalk where each cut matches its pair to the side.
In this design the center cross is cut slightly deeper than the other slashes, encouraging the center area to open more dramatically.
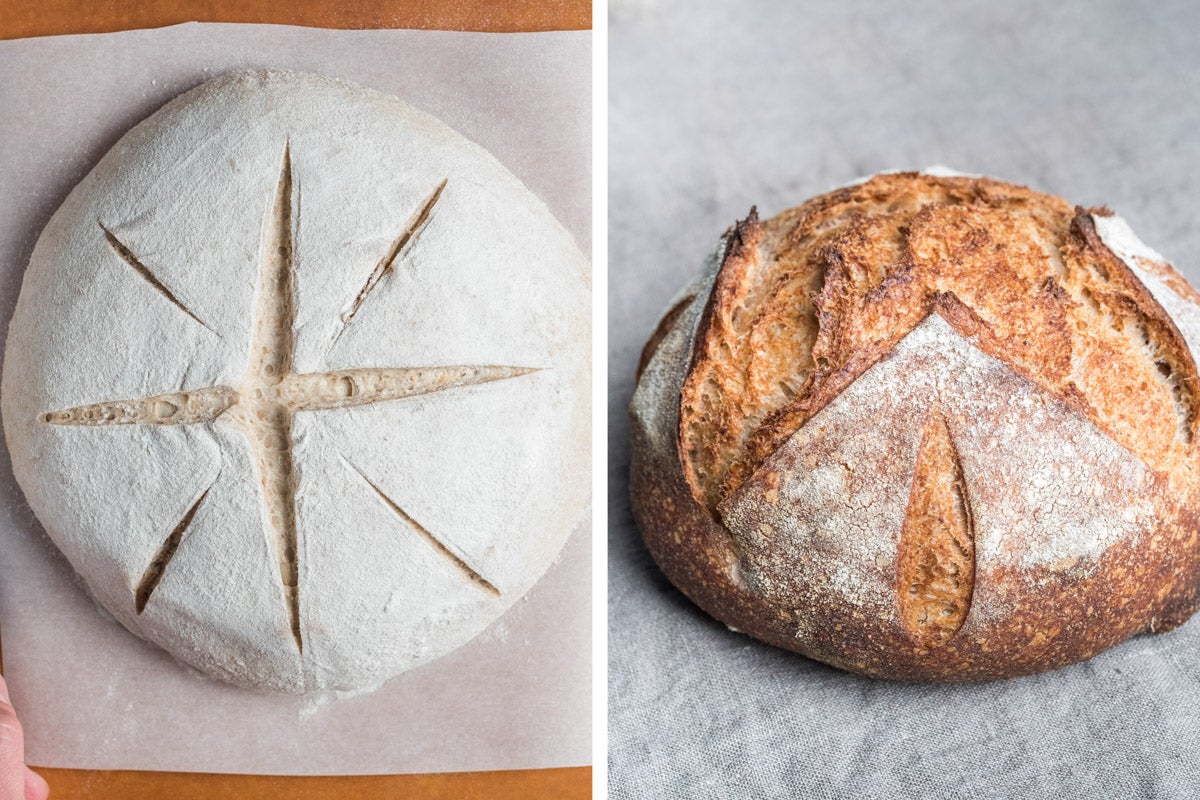
Similarly to the first design, the cross and side slashes are best done with a straight blade angled at 90° to the dough’s surface.
As seen above, start with the cross and cut in slightly deeper than for the secondary cuts to the side. If you want to take this even further, the cuts to the sides of the cross could be replaced with small wheat stalks as seen in the first design. This leads to an incredibly detailed score!

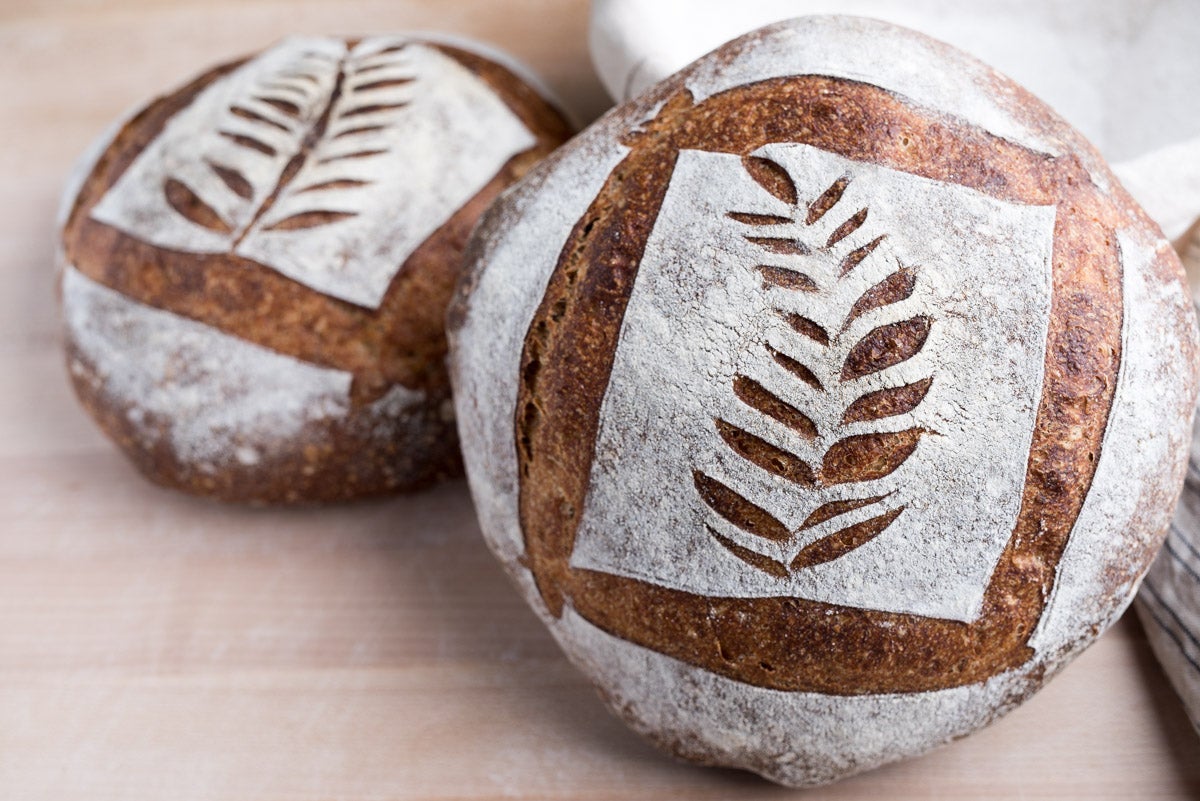
The preferred scoring implement for this design is again a straight blade. However, if you want the “box top” to lift up and off the rest of the dough, a curved blade could be used to create a small lip for each edge of the box.

Start first with the perimeter box by making four straight-edge slashes. Because this area will remain mostly flat during baking, score any design you wish at the top. Feel free to be creative! I choose to score a wheat stalk in the box top with a curved line running down the middle.

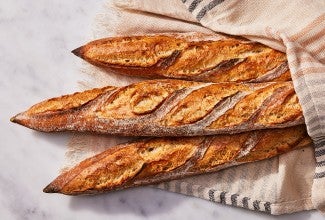
It’s no secret that my favorite shape for a loaf of bread is a batard. While I'm partial to a single, long slash allowing the loaf to open up beautifully, there are times a double slash can be equally stunning.

The preferred scoring implement for this score is a curved blade. The curve helps create a lip at each cut that peels back when the dough is baked. Start at the side farthest from you and make an angled cut to about the middle of the batard. The beginning of the second cut should overlap the end of the first. Additionally, the closer the two cuts are to each other the smaller the separation when they expand.
This design can also be useful for dough you know won’t spring up high when baked — perhaps it’s a whole wheat recipe or there’s a large percentage of mix-ins. The double score usually opens nicely even with these types of breads.

These designs are only a starting point for you to develop your own unique and creative mark with decorative cuts. Let the lame be your paintbrush — be creative and have fun!
Do you have a favorite scoring pattern? Let us know in the comments below!


November 2, 2020 at 3:16pm
Hi. I have trouble scoring breads that have 1/5th or more premium whole wheat flour mixed into unbleached Bread flour. The dough rises beautifully but the scoring makes the dough collapse which results into a flat baked bread (not so when scoring is omitted). I do not hav this issue at all using only unbleached Bread flour. How can I resolve the issue ?
November 3, 2020 at 9:29am
In reply to Hi. I have trouble scoring… by Saskia (not verified)
This isn't uncommon when dealing with whole grain loaves, Saskia! The gluten structure of your loaves will always be a bit more tenuous in these types of breads. You can try adding a bit of vital wheat gluten into your dough to help strengthen it a bit, and also scoring your dough while it's chilled from the fridge. But some extra expansion is typically to be expected. Best of luck, and happy baking!
November 2, 2020 at 2:27pm
I want to leave the banneton marks on my loaf of bread. Is it necessary to score if I want to leave these? Do I need to flour if I am just scoring to keep the bread from exploding?
November 3, 2020 at 9:32am
In reply to I want to leave the banneton… by Nancy (not verified)
Hi, Nancy! In general, you'll want to score freeform loaves in order to prevent them from breaking apart in unseemly ways. If you like the rustic look of a crack-topped loaf, though, feel free to skip the scoring! It's just a different style. You'll want to flour your banneton in order to get those lovely lines on your loaves regardless of whether or not you decide to score your loaf. Happy baking!
June 17, 2020 at 12:47pm
I am working on my scoring for batards, the single long cut. I know the slash should be made at a 30 degree angle to the bread, but how deep? I have been doing a half inch, but maybe that is too deep? I have also taken to just holding the razor blade in my hand because half the time, it falls off the lame while I'm making the cut, and that's just annoying. Which means then, that it's no longer a curved blade if I'm holding it in my hand. But I've never understood the curved lame blade anyway, especially if we're only use thing corner of the blade anyway. Can you explain that? Thank you.
June 18, 2020 at 12:54pm
In reply to I am working on my scoring… by Carol (not verified)
Hi Carol! A curved blade makes it easier to get the correct angle. Scoring is usually between 1/2" and 1" deep. Happy baking!
May 29, 2020 at 1:54pm
when trying to score, the lame blade sangs and sticks in the dough, have yet to get a good deep ear. Have to go over the scores several times, even into early baking. What do I need to do to allow a good swift proper score.
June 4, 2020 at 10:36am
In reply to when trying to score, the… by Peter Mandell (not verified)
Hi Peter, a sharper blade may help, ensuring that only the corner of the blade is hitting the dough and not the whole side of it which will snag, and it can also help if the dough is a little cold. You can try chilling the loaf in the fridge for about 20 minutes before scoring.
September 18, 2020 at 11:59am
In reply to Hi Peter, a sharper blade… by anicholson
Any other tips to get ease of slashing? Refrigerated proofing, rice flouring, good sharp blade all to no avail. The blade "Catches" and drags aa hunk of surface dough forward---whilst NOT making a cut. I invariably have resorted to a deep scissoring to obtain only the teeny-tiniest of ear lift after the full bake. Anything else you could suggest?
September 22, 2020 at 9:33am
In reply to Any other tips to get ease… by Robin Whelan (not verified)
Hmm, that sounds really frustrating! Does this happen with all your bread doughs, or just one particular recipe?