


I was always one of those kids who played with my food. I didn't mash it up or just push it around my plate; I’d carefully arrange the ingredients as if I were creating a work of art. Imagine salads topped with concentric rings of vegetables organized by color, and French toast reminiscent of a Jackson Pollock painting (only more organized). I loved bringing together the world of art and food as a child — and as a matter of fact, I still do.
Now that I've entered the world of adulthood and playing with my dinner isn't quite as acceptable, I turn to recipes that have the potential to become pieces of art instead. And the perfect canvas for a baker to create a scene that's both delicious and gorgeous? Focaccia!
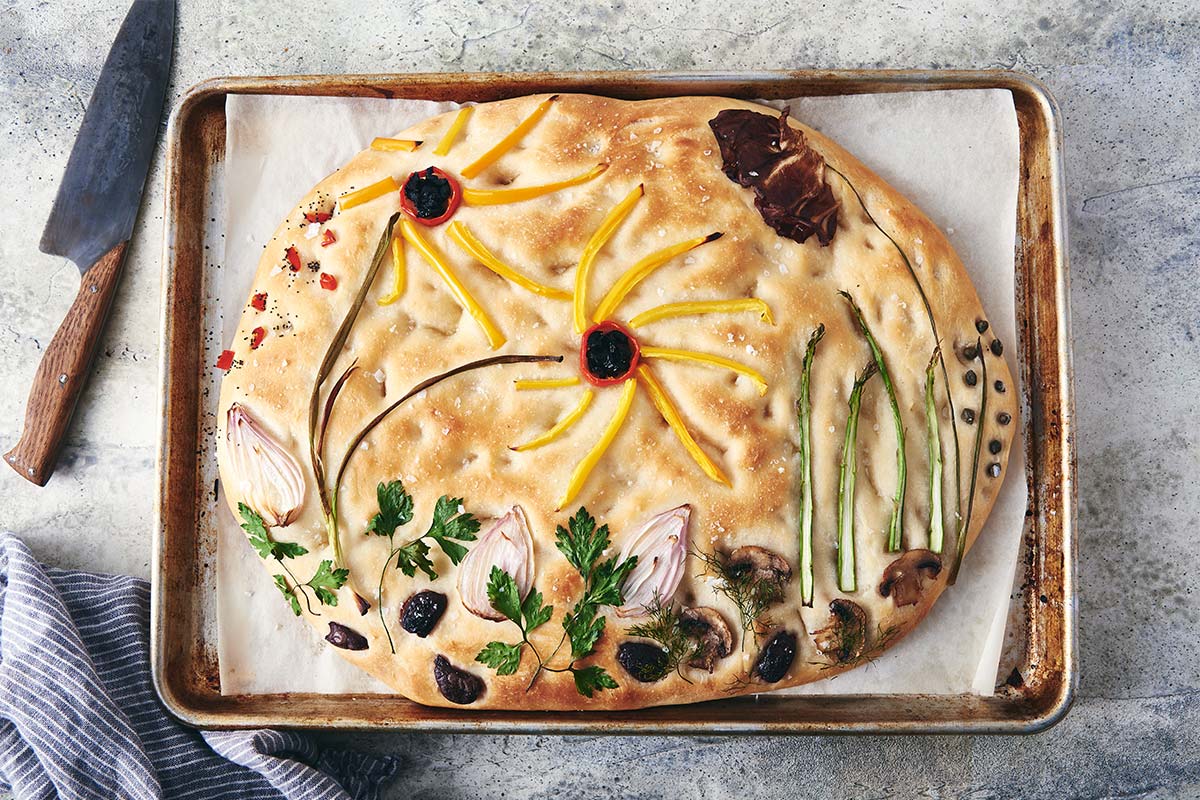
Focaccia on its own is a delight to eat. It’s pillowy, dimpled with pockets of olive oil and sea salt, and often scattered with fresh herbs. The only way to make it better? Top it with precisely arranged vegetables and other tasty ingredients to create a beautiful garden scene.
This style of "garden focaccia" looks impressive but can also be quite easy to execute if you know the right tips. I'll share a straightforward process for making your own garden focaccia at home, and then send you off with a few tricks to ensure the final bread looks incredible.
Start by finding inspiration for the garden scene you’ll create. This could include looking at photos or paintings, going for a walk outside (if the weather allows), or even browsing the aisles of your local grocery store to see what’s vibrant and in season.

If you’re a planner, grab a piece of paper and sketch out what you want your scene to look like. If you’re a “wing-it” kind of person, skip straight to gathering a plethora of your favorite toppings. You can create based on what you have!
Once you have a plan (or at least inspiration) for your garden focaccia, it’s time to make the dough.
I’m using our Garden Focaccia recipe because of its delightful softness — both in the dough and finished product. It’s tender and moist, plus has a subtle potato-y flavor that's easy to build on without being completely bland.

Most focaccia recipes will work as long as they’re sufficiently large enough to build your garden dreams. Use your favorite recipe or try one of our tasty focaccia variations, if you like. Then it’s time to watch your garden grow!

While your dough is rising, prepare your toppings by washing, peeling, slicing, and/or de-seeding your vegetables based on how you want to eat them. It helps to leave some pieces large and others small so you end up with a variety of colors, sizes, and textures.

Since most focaccia recipes call for baking at a high temperature, you don't need to pre-cook any vegetables. They'll roast in olive oil on top of the dough while it's baking. The only exceptions are ingredients like onions that you may want to caramelize.
Otherwise, set yourself up with a palette of fresh vegetables, ready to create your scene.
Now comes the fun part! When the dough is almost finished rising, gently dimple the surface with your fingertips. (Usually the dimples in focaccia are quite prominent, but you to create a relatively flat surface to work on, so go easy on the dough.)
Preheat your oven to the temperature called for in the recipe. Then drizzle olive oil over the dough, using slightly less than the amount called for in your recipe. (Using a modest amount of oil helps prevent the dough and toppings from becoming soggy and also creates a cleaner look.)
Place your toppings on the surface of the dough, using colors, patterns, textures, and flavors to your advantage. Remember, there's no right way to create art — feel free to be creative.

Make the scene as simple or detailed as you like, then take a step back from the focaccia to enjoy your work.
Make sure your oven is fully preheated, then bake your garden focaccia according to the recipe. Keep an eye on it and check for doneness about three-quarters of the way through the baking time, as some of your toppings (like onions) may brown faster than expected.

The focaccia should be lightly golden in the bare spots of the dough, between all the toppings. Use a spatula to peek at the bottom when it appears done on top; it should be crispy and have started to brown. A little bit of caramelization delivers lots of flavor, while the inside will stay tender and soft.
Transfer the focaccia to a wire rack to cool, or leave it right in the pan if you want to serve it warm. Make sure you pause and appreciate the work of art you've made before diving in — and feel encouraged to photograph your creation if you wish. Garden focaccias are the definition of Instagram-worthy!

Before you make your next garden focaccia, take note of these tips straight from our test kitchen. They'll help you embrace your inner artist (and baker):

When everything is done, take your garden focaccia outside to enjoy in the fresh air, if you like. Or, if you're somewhere cold and blustery, at least treat yourself to a moment at a window, taking in some natural light along with the smell of your focaccia. Take a bite of your garden focaccia and enjoy the fact that something so beautiful can also taste so satisfying.
For more recipes that you won't be able to resist photographing, check out our collection of Extraordinary Breads. The dozen recipes featured will have you thinking about bread in a whole new way.
Cover photo by Liz Neily


November 28, 2022 at 3:34pm
I made this delightful Garden Focaccia for Thanksgiving this year. It illicited many Oohs and Aahs!
however, I found it really tough to cut - finally used some scissors, and, ultimately, very tough and chewy. What should I do differently next time? I followed the recipe very closely.
December 4, 2022 at 3:46pm
In reply to I made this delightful… by Calla Jean (not verified)
Hi Calla, for a softer focaccia, you may want to make it a little thicker next time and perhaps reduce the baking temperature to 350°F after 15 minutes of baking. Aim for a nice light golden brown color. A tough bread could also be the result of adding too much flour, which is easy to do if you measure your flour by cups. For best results with our flours and recipes we recommend either weighing your flour or using this method to measure your flour by cups. One other possible cause of a tough dough would be over-kneading, which is unlikely to happen when you knead by hand, but could happen when you knead with a stand mixer. When using a KitchenAid type mixer, I would mix on the lowest speed for about 3 minutes to blend all the ingredients, and then mix on speed 2 for 3-4 minutes to knead the dough.
June 27, 2021 at 4:14pm
We’ve had fun making garden focaccia over the past several weeks. It is now our “signature dish” to have out (uncut) when guests arrive.
I spray the design with olive oil spray just before baking to protect the veggies and herbs a bit. We like the mini peppers to make flowers and use finely chopped olives for “dirt” at the bottom. Thin slices of shallots (from root to stem) make beautiful flowers as well and taste delicious when baked. I have also used carrots, scraped lengthwise with a channel knife, then thinly sliced, as flowers. It’s fun to go out to the herb garden and get inspiration!
June 27, 2021 at 12:39pm
I love all the ideas and recipes given on the King Arthur Baking site. I do wish that they were printable in all cases. I do not usually save blog posts long term and I am afraid I am a cookbook kind of cook rather than a 'look it up on the computer' kind of cook. I spend far too much hand copying the portions of posts which interest me when the recipe is not printable.
June 28, 2021 at 2:56pm
In reply to I love all the ideas and… by Audrey Zart (not verified)
Hi there, Audrey! In an effort to encourage folks to conserve paper and other resources, we don't have a print feature on our blog articles, but we link the recipe featured in a blog article at the top of each post just below the heading. You can find our Garden Focaccia recipe with a printer-friendly version here. If you find an article that you'd really like to print to have on hand you can print it by using your browser settings, just right-click and select "print" from the menu. We hope this can help to clarify and happy baking!
May 16, 2021 at 9:41pm
I made this today, and WOW! It was delicious! And so much fun creating a garden scene! I’ve never made focaccia before, and this was super easy! Thus will definitely be in my rotation!
March 15, 2021 at 10:49am
Re: adding herbs after baking — How does one attaché the herbs to the bread’s surface? With an egg white wash just before the bread is finished?
March 15, 2021 at 11:25am
In reply to Re: adding herbs after… by Molly O’ (not verified)
Hi Molly! If you wanted to add a few herbs we'd recommend using olive oil to get it to stick. Just brush the oil onto the dough, sprinkle the herbs on, and that should keep it in place. Thanks so much, and have fun being creative!
February 27, 2021 at 8:47am
I did this and was pleased with the ‘scene’ before baking. However, it all charred a bit in the oven so didn’t appear nearly as appealing as when it was fresh. Any suggestions for this, or just accept the landscape changes with heat?
February 27, 2021 at 4:01pm
In reply to I did this and was pleased… by Helen (not verified)
Hi Helen, as some veggies burn more quickly than others, you'll need to plan your garden accordingly. It may help if you lower the temperature and bake for longer.