


Are you ready? I’m about to admit a deep, dark secret, something I withhold from even my test kitchen buddies and best friends.
I don’t care for yeast doughnuts. As in squishy-soft, Krispy Kreme-type raised doughnuts. Even hot from the fryer, dripping honey glaze or white icing, those pillowy puffs of fried dough do absolutely nothing for me.
Is it sugar overkill? The very slight chewy “bite” all yeast breads have? Whatever the reason, meh; give me a melt-in-your-mouth, tender cake doughnut — one made with baking powder or baking soda, not yeast — any day. Especially if it that doughnut is baked (not fried).
It took us a couple of days (nine batches and over 100 doughnuts) to hit on exact ingredient amounts, but in the end, success!
Now, some may quibble that baked doughnuts are doughnuts in shape alone; that without the signature crispiness and flavor resulting from a bath in hot fat, they’re just a piece of cake in doughnut guise.
But honestly, once you get past expecting a crispy fried crust, baked doughnuts are very compelling indeed. They present as doughnuts: round and full, with a hole in the middle. They taste like doughnuts: cinnamon, or apple cider, or pumpkin, or… choose your favorite.
And baked doughnuts are so much easier to make. While I do love deep-fried cake doughnuts, I don’t care for the time commitment, hassle, and mess of the frying process — not when I can easily whip up a batch of batter, pour it into my doughnut pans, and in less than an hour have a dozen cake doughnuts ready to share and enjoy.

This was my mindset as I pulled out a recipe I’d been meaning to try for quite some time: Chocolate Fudge Cake Doughnuts. I turned on my oven, fully expecting to be enjoying a luscious, oven-warm chocolate doughnut within the hour, but …

Like children, recipes can sometimes misbehave. And it turns out Chocolate Fudge Cake Doughnuts have had a penchant for quirky behavior. For most people, the recipe works fine. For some, though, it’s a disaster: doughnuts that overflow, stick in the pan, and — even if they do finally come out — crumble at the first opportunity.
Which was exactly what happened to me. The doughnuts overflowed the pan’s boundaries, creating the doughnut equivalent of a mushroom-top muffin. About half stuck in the pan. And even the intact doughnuts wanted to crumble as I spaced them on the cooling rack.
I immediately turned to our test kitchen team — which unbeknownst to me was already on the case, having been alerted by some less-than-stellar reader reviews.
After some back-and-forth among five of us test bakers, we hit on a few things to try:

It took us a couple of days (nine batches and over 100 doughnuts) to hit on exact ingredient amounts, but in the end, success: a dozen doughnuts that drop out of the pan without sticking, are perfectly tender yet sturdy enough to be iced or sugared without crumbling, and that taste (and look) just great.
This may look like a long list of ingredients, but no worries; it’s all pretty common pantry stuff.

First, preheat your oven to 350°F. You're going to have these doughnuts ready in a snap, so best to start the oven first thing.
In a large mixing bowl, whisk together the cocoa, flour, sugar, baking powder, baking soda, salt, espresso powder, and chocolate chips. Set aside.
In a large measuring cup or medium-sized mixing bowl, whisk together the eggs, milk, vanilla, and vinegar.

Add the wet ingredients to the dry ingredients, stirring to roughly blend. Once you can no longer see any bits of raw egg, stir in the melted butter.

There's no need to beat the batter, just make sure everything is well-combined.
Lightly grease the wells of two standard doughnut pans. If you don't have two pans, simply bake the batter in two batches.

Spoon the batter into the prepared pan(s), filling the wells about half to two-thirds full; there should be about 64g to 70g batter in each well.

Bake the doughnuts for 12 to 15 minutes, or until a toothpick inserted into the center of one comes out clean. Don't overbake the doughnuts, as this could dry them out.

Remove the doughnuts from the oven and after 30 seconds or so, use a nylon heatproof spatula or table knife to carefully loosen their edges. Turn the pan upside down over a rack, gently tap the pan on the rack, then give it a little shake; the doughnuts should fall onto the rack. If one or two stick, use the spatula or knife to loosen them further. Do all of this quickly; the longer you wait, the more chance the doughnuts will stick.
For simple sugar-coated doughnuts, immediately shake the doughnuts in a paper or plastic bag with a tablespoon or so of granulated sugar.
You can also shake the doughnuts in confectioners' sugar if you like, but do so once the doughnuts are completely cooled (and just before serving), since confectioners' sugar will quickly "melt" into the doughnuts. An easy solution: use non-melting white sugar, a type of confectioners' sugar that won't melt and disappear.

If you want to ice the doughnuts instead, give them a chance to cool to room temperature first.

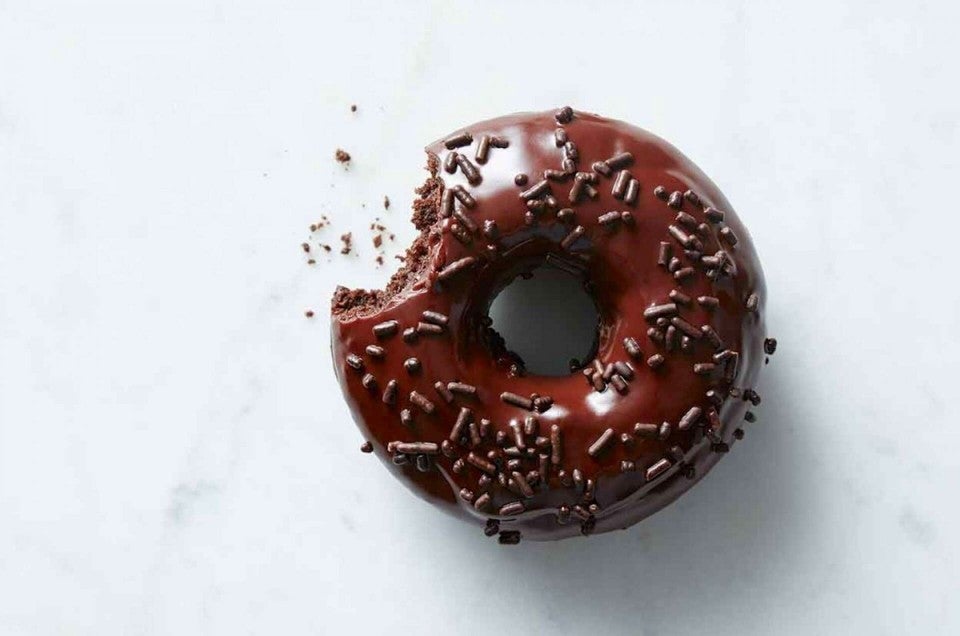
For iced doughnuts, combine 1 cup (170g) chocolate chips and 1/4 cup (57g) milk or half-and-half in a microwave-safe bowl or in a saucepan. Heat in the microwave (or over a medium-low burner) until the liquid is steaming and starting to bubble. This will take about 1 minute in a microwave, probably a bit longer over a burner. Remove from the heat, and stir until the chips have melted and the icing is smooth.

Dip the top of each doughnut in the icing, spreading to coat with a spoon, knife, or spatula; or skip the dipping and simply spread the top of each doughnut with icing.

Garnish with sprinkles or shaved chocolate, if desired.

I’d say these doughnuts now take the cake — thanks to a quick collaboration with the King Arthur Baking Company test bakers. Much appreciated, team!
Has a King Arthur recipe ever failed you? If it happens, please let us know via the review option at the end of each recipe. Despite our best efforts, some misbehaving recipes simply fall through the cracks. And if we don't know it's broke, we can't fix it!


August 19, 2020 at 10:47am
In reply to I have a cake pop maker and… by Stasia Mento-Moloney (not verified)
Hi there, Stasia! We haven't tried using this recipe in a cake pop maker but we don't see why it wouldn't work out!
August 18, 2020 at 6:12pm
I did make these, however in place of heating up my oven (plus I don't have donut pans), I made them in my waffle maker. I used a wooden skewer to pop them loose and they came right out, perfect. I scooped them with a number 30 disher and ended up with 15 waffle donuts.
August 17, 2020 at 8:44pm
Hi, Could I use this recipe in a waffle maker ?? I would love to try it, but cleaning a waffle maker when something sticks is not a fun thing to do. Thank you,
August 19, 2020 at 11:52am
In reply to Hi, Could I use this recipe… by john emery (not verified)
Hi there, John! We haven't tried making this recipe in a waffle iron but you're welcome to give it a try if you'd like! We do have a Chocolate Malt Waffles recipe that you might be interested in though. We hope this helps and happy baking!
August 17, 2020 at 11:24am
These were delicious and fast. I also appreciated not having to break out the stand mixer. I ended up making 11 doughnuts since I had a heavy hand filling the pan on the first batch.
August 16, 2020 at 10:42am
The best tip I ever came across for making cake donuts is to scoop the batter into a Ziploc baggie, cut the tip off of one of the corners, and squeeze the batter out of that opening and into the donut pans. You get those pans filled in no time flat!
August 13, 2020 at 8:04pm
Is it possible to freeze these donuts to use later? Do they still have a good flavor and texture?
August 14, 2020 at 10:13am
In reply to Is it possible to freeze… by Melissa Tetrick (not verified)
Hi, Melissa! If you haven't put glaze on them yet, they freeze beautifully. Happy baking!
May 29, 2023 at 1:03pm
In reply to Hi, Melissa! If you haven't… by kmayerovitch
Tips on thawing to eat from freezer?
June 2, 2023 at 2:42pm
In reply to Tips on thawing to eat from… by Alice (not verified)
Hi Alice, you can simply move them from the freezer to the fridge to thaw slowly overnight before serving at room temp. Happy Baking!