Carl's Cinnamon Rolls

Recipe by Carl Nelson

Cinnamon rolls — what better way to wake up early on a sunny winter morning than with the smell of cinnamon wafting through the house? The following recipe comes from Carl Nelson of Whittier, California, who wrote to thank us for our Baker's Catalogue, and to say he appreciates "the interesting items and ingredients that are not easy to find locally." He also sent a photo of himself with a note: "Enclosed is a photo of me proudly displaying my last batch of cinnamon rolls. They made quite a hit with our family and friends." See our baker's tips, below, for more from Carl.

Prep
40 mins
Bake
30 to 35 mins
Total
3 hrs 15 mins
Yield
20 rolls
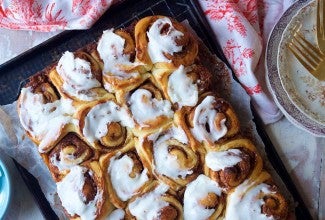
Carl's Cinnamon Rolls - select to zoom

Instructions

Prevent your screen from going dark as you follow along.
  1. To make the dough: Weigh your flour; or measure it by gently spooning it into a cup, then sweeping off any excess. Mix and knead all of the dough ingredients together — by hand, using a stand mixer, or in a bread machine set on the dough cycle — to make a smooth, supple dough.

  2. Turn the dough into a lightly greased bowl, cover the bowl with plastic wrap, and allow the dough to rise until puffy, 1 to 2 hours. If you're using a bread machine, allow the machine to complete its cycle.

  3. Transfer the dough to a lightly oiled work surface, and divide it in half. Working with one piece at a time, pat and then roll the dough into a 12" x 18" rectangle.

  4. For the filling: Brush each piece of dough with 1 tablespoon of the milk, leaving a 1" bare edge along one long side. Combine the remaining filling ingredients and sprinkle them evenly over each rectangle.

  5. To assemble the rolls: Working with one piece of dough at a time, start with a long edge and roll the dough into a long log (not too tightly, or the centers of the rolls will pop up during baking). Make sure to finish up at the edge that isn't brushed with milk or butter. Brush that edge with water and pull it up over the log, pinching to seal. Roll the log so it's seam-side down on your work surface.

  6. Use a ruler to mark off 1 3/4" intervals, then use a serrated knife to gently cut 10 rolls from each log; you may also loop dental floss around the log at each interval and pull, which gives you a nice, clean cut.

  7. Transfer the rolls to a lightly greased or parchment-lined baking sheets, leaving about 1" between each roll. These will fit nicely on a half-sheet pan.

  8. Brush the sides of each roll with melted butter or vegetable oil, if desired; this makes the rolls easier to pull apart after they're baked.

  9. Cover the rolls with lightly greased plastic wrap, and set them aside to rise until puffy but not doubled in bulk, about 1 1/2 hours. Towards the end of the rising time, preheat the oven to 350°F.

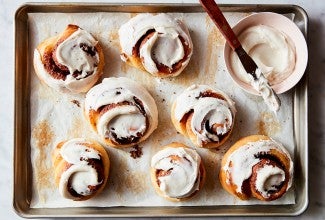
  10. Uncover the rolls, and bake them for 30 to 35 minutes, until golden brown. Remove them from the oven, and allow them to cool slightly, as you prepare the frosting. (Cooled rolls can be well wrapped and frozen. Don't frost immediately if you plan to reheat them.)

  11. To make the frosting: Using an electric mixer, beat together the butter, sugar, cinnamon, salt, orange juice, liqueur, and orange oil, if you're using it. Beat until light and fluffy, 1 to 2 minutes. The mixture should be of spreading consistency, like a soft buttercream frosting.

  12. Frost the rolls while they're warm. Remove them from the pan, and allow them to cool on a rack.

  13. To reheat frozen rolls: Remove the rolls from the freezer, and allow them to thaw, in their wrapping, at room temperature. This will take about 1 to 1 1/2 hours.

  14. Remove the wrapping, and bake the rolls in a preheated 350°F oven for about 7 minutes, or until they're very hot. Remove them from the oven, and frost them.

Tips from our Bakers

  • From Carl Nelson, the baker who shared this recipe with us: "My dad and mother were born in Sweden, where Dad had a seven-year apprenticeship in baking before he came to this country. Dad and I operated, for a number of years, the largest Swedish bakery in the West. It was located in Los Angeles, and we enjoyed having some interesting customers: Greta Garbo, Ingrid Bergman (she didn't come in person — her uncle shopped for her), and each week we delivered an order to Mary Pickford at Pickfair. There were others, of course.

    "I miss the baking business, but try to keep my hand in the dough at home. A couple of years ago I purchased a Zojirushi bread machine. Our friends thought I had gone bonkers. Although I did use the machine for a time to bake bread from start to finish, I was not pleased by the fact that, with the pre-timing of the process, loaves would not be uniform in size. Therefore, when I use the machine (and I still do occasionally), I use it for preparation of the dough only, after which I mold the loaf and place it in a regular bread pan. This way, I can adjust the rising time according to weather conditions, etc. And not only that, with this method it resembles a traditional loaf of bread — I like that!"
  • Carl's original recipe made two full baking sheets of sturdy, proud rolls. For simplicity's sake, and because most of us aren't feeding 40 people at a time, we've cut Carl's original recipe in half. Feel free to double it if you're feeding a crowd.

  • Want to prepare these rolls ahead of time, freeze or refrigerate them (unbaked), then bake fresh? To freeze, see our blog post, Freeze! Time-savers for the holidays. To prepare the night before, place the shaped buns in the pan, cover the pan, and refrigerate overnight. Next morning, let the buns warm at room temperature for about an hour, covered. Uncover and bake as directed.

  • Neat way to slice a log of dough into buns? Use unflavored dental floss. Tie a loop around the log, then pull it tight directly over the spot where you want to slice. The floss will cut through the dough easily without squashing the log like a knife might. For step-by-step photos see our blog post, A simple trick for cinnamon rolls.