Homemade pasta is great. Homemade pasta with a cheesy, herby, filling? Even better.
Whether you’re comfortable making homemade pasta noodles and want to level up to filled shapes or just making fresh pasta for the first time, homemade ravioli is easier than you think. The whole process can basically be broken down into four steps: roll, fill, shape, and boil.
Here’s how to master them, step by step:
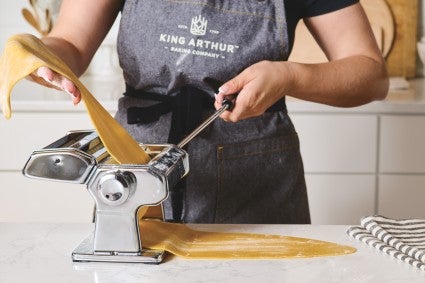
Once you have your pasta dough ready and rested for at least 30 minutes (any standard egg-based dough will work; our Homemade Cheese Ravioli is a great one!), you need to roll it out into flat sheets, just like most homemade pastas.
If you have a pasta machine, great! Use it to roll the dough out to setting #8 on a standard pasta roller (0.6 mm thick).
If you don’t have a pasta machine, not to worry: You can roll out your dough by hand with a rolling pin until it’s about 0.6 mm thick; we recommend a straight, non-tapered French rolling pin with a long dowel. To roll, start in the middle of the piece of dough and roll away from you. Return your pin to the middle of the piece, then roll towards you. Repeat this movement: Start in the middle again, roll away from you, then return your pin to the middle and roll towards you. You want to roll all the way to the edge of the dough, so that it is evenly thick. (Our biggest piece of advice? If the dough is snapping back while you try to roll it, let it rest for 10 minutes then resume rolling, which allows the gluten to relax.)
Cut your pasta sheets into long rectangles about 4 3/4" wide. Now you’re ready to fill the ravioli.
Choose your filling. We like this classic cheese filling, made with ricotta and Parmesan and punched up with fresh herbs. This savory pumpkin filling is also quite nice.
Lay out one sheet of ravioli on a flour-dusted work surface so that the long side is closest to you. Dollop 1 tablespoon of filling 1/2" from the left edge and 1/2" from the bottom edge of the pasta sheet. (The top half will eventually be folded horizontally over the bottom half of the pasta sheet, so the mounds of filling should be in the bottom half of the dough.)
Continue adding 1-tablespoon portions of the filling at 1" intervals down the length of the pasta sheet until you’ve reached the end of the pasta sheet. Now you’re ready to fold and cut!
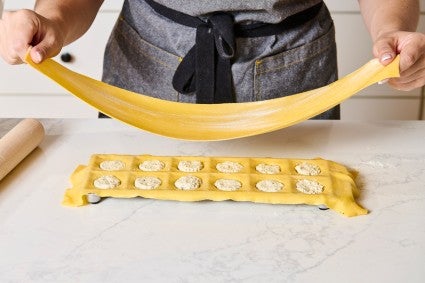
To shape your dough into finished ravioli, brush a thin layer of cool tap water on the pasta sheet along the 1/2" bottom edge and on either side of each of the scooped filling mounds. This water acts like glue to help the dough adhere and prevent the filling from leaking.
Fold the top half of the pasta sheet over to cover the filling mounds, matching the top edge with the bottom edge. Starting in the center of the pasta sheet and moving outward in both directions, press out any air pockets between the filling mounds and lightly seal the pasta to encase the filling.
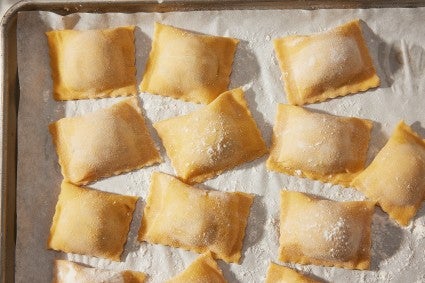
Now that the filling is sealed inside, it’s time to cut into ravioli shapes. The good news is that you can cut ravioli with a variety of tools, from fancy ravioli stamps to a simple chef’s knife. Here are your options:
A sharp chef’s knife or bench knife: Working with the basics? You can still cut your pasta dough with a chef’s knife or a metal bench knife. It’s not as precise as other tools but works well in a pinch.
A pastry wheel: Like a chef’s knife, this isn’t totally precise, but it allows you to work quickly and makes cutting a breeze. Plus, you can get a pretty fluted edge.
Cookie cutters: Use round or square cookie cutters to stamp out uniform shapes, either with straight or fluted edges.
Ravioli stamps: For more flexibility with your shapes and exact precision, use ravioli stamps. These are a great way to achieve fun shapes — like hearts! — and professional touches like a fluted edge; plus, they allow you to cut and seal the pasta in one step. Make sure your stamps are nice and sturdy, as a wobbly stamp can be difficult to work with and results in messy cuts.
Baker’s tip: Make sure to seal each raviolo well when shaping; otherwise they can leak or explode while boiling.
A ravioli tray: Another handy tool, a ravioli tray makes quick work of filling, shaping, and sealing; it also makes each raviolo the exact same shape and size. This shaping process works slightly differently: Lay your dough into the tray, pressing so it’s flat against the bottom of each well. Dollop the filling into the depressions in the tray, brush the surrounding dough with water, then place a second piece of dough over top and use a rolling pin or your hands to press to adhere. Cut with a knife or pastry wheel, and remove from the tray.
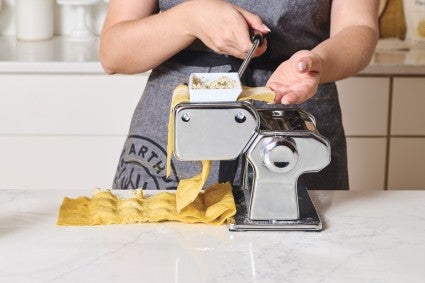
A ravioli attachment for your pasta machine: A pasta machine doesn’t just make noodles — with the right attachment, you can also make ravioli. This process is a little different: Dollop your filling into the opening on top of the attachment and turn the handle to sandwich it between sheets of pasta. This is a pricey tool, but if you’re making lots of ravioli, it’s worth considering!
To cook the ravioli right away: Bring a large pot of heavily salted water to a boil. Add a portion of ravioli to the water, ensuring they can all cook without overlapping. Boil for 6 to 8 minutes, flipping individual ravioli every couple of minutes to promote even cooking. Drain the ravioli and serve immediately with your sauce of choice.
To cook the ravioli later: Freeze uncooked ravioli on a flour-lined baking sheet until solid; then transfer to a zip-top bag. Store in the freezer for up to two weeks and boil directly from frozen. Frozen ravioli may require a couple extra minutes of cooking time.
Planning on making more pasta? Here are the tools you need to start making homemade pasta.
Cover photo by Rick Holbrook; food styling by Kaitlin Wayne.