How to make colorful slice-and-bake sugar cookies
A simple technique for creative cookies.


We all know and (secretly) adore the store-bought slice-and-bake sugar cookie logs that, when sliced, reveal a design in the center of the cookie. But as a professional baker, I couldn’t resist making a from-scratch version. So ahead of Valentine’s Day, I started working on a copycat recipe featuring a sweet red heart inside a lemon cookie dough. Behold, lovers: Slice-and-Bake Valentine Cookies.
And the best part? Once you master the technique for these cookies, the sky is the limit for using different cutters and colors to make slice-and-bake sugar cookies with (almost) any design.

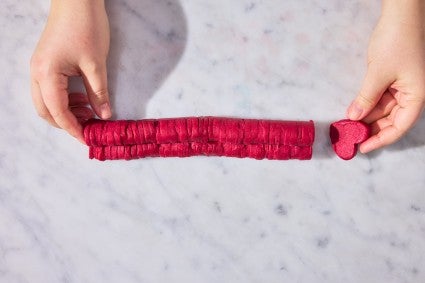
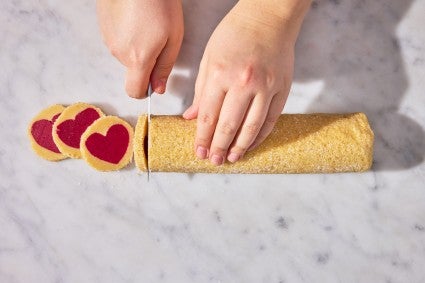
Before we start riffing, let’s first dissect the recipe as written. These cookies have an embedded heart in each slice and are a fun, festive way to spread the love. You mix one dough, divide it in half, and color one half of the dough with food dye. (I used these plant-based food colors.) Then, roll out the colored dough, cut out heart shapes with cookie cutters, stack the hearts to make one long heart-shaped log, and chill until firm. Finally, wrap the chilled “tower” of hearts in the remaining plain dough to form a neat cylinder before rolling in sparkling sugar, chilling (again), slicing, and baking.
I know that feels like a lot of steps, but I promise it’s not as involved as it sounds. The dough is quick to roll out, cutting and stacking is surprisingly streamlined, and the plain dough stays soft so it’s easy to wrap around the chilled log of hearts. Here are my tips to help you perfect the recipe.
When rolling out the colored dough before cutting any shapes, be consistent with the thickness of the dough. If you start with an evenly thick dough, you will be able to stack the most level tower of cutouts. This, in turn, helps facilitate even slicing. I suggest rolling the dough about 1/4" thick.
When choosing a cutter for the shape at the cookie’s center, select a simple shape and a small cutter, about 1 1/2" to 1 3/4" in diameter. Hearts, stars, a basic flower design, or single numbers or letters are all good options. Basic shapes without any intricate angles are the easiest to wrap with the plain dough, which will result in the best definition of the embedded design after baking. Save the snowflake for another time!
The most critical part of this technique is to be mindful of the temperature of the colored dough. If, at any point, you feel the dough becoming too soft to work with, transfer it to the refrigerator to chill for 15 or 20 minutes. When trying to create a 9" to 10" log of heart cutouts, things can quickly go from wonky to borderline unrecognizable if you are working with dough that’s too warm. Trust me, a little chill goes a long way in creating the sharpest shapes.
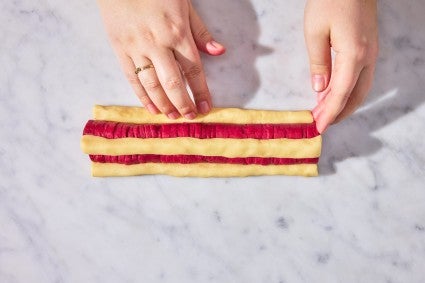

While the heart log is chilling, divide the remaining plain dough into six pieces and use your hands to roll each piece into a cylinder that is 9" to 10" long (the same length as the heart log). Remove the chilled heart log from the refrigerator and attach the logs of plain dough to it, spacing them evenly and pressing gently to adhere. Carefully press and flatten the plain logs, smoothing them with your fingers, until they encase the hearts.
Monitoring the temperature of the dough also applies to the fully assembled cylinder. Be sure to let the log of dough chill until very firm, at least one hour and up to three days, before slicing and baking.
Of course, you can customize this recipe to your liking with other colors and flavors. The recipe is written for a lemon-scented dough with red hearts, but it would be just as easy to create yellow stars with an almond-scented dough, or pink flowers flavored with a touch of rosewater extract. The recipe was developed using plant-based natural colors, but liquid or gel food coloring can also be used; adjust the quantity as needed. The dough can also be made gluten-free by using Gluten-Free Measure for Measure Flour — no other substitutions necessary.
Whether you’re new to slice-and-bake cookies or a seasoned pro who’s been impressing with Checkerboard Sablés and indulging in World Peace Cookies 2.0 for years, I hope you’ll give the latest addition to our slice-and-bake lineup a try. Once you master this technique, you’ll find yourself customizing batch after batch for every occasion.
Cover photo by Patrick Marinello; food styling by Lydia Fournier.