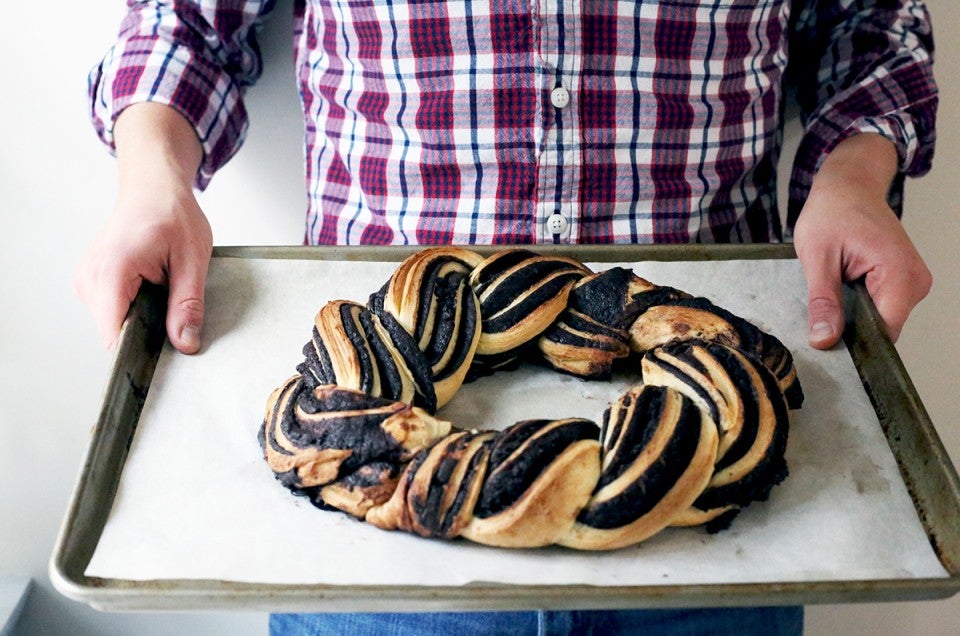


It's hard not to love chocolate babka: a tender yeasted dough ribboned with sweet chocolate filling. And it's even harder not to swoon over its dressed-up holiday version: the chocolate babka wreath.
Although babka looks intricate and time-consuming, our recipe (thanks to the masterful Michelle Lettrich of Brown Eyed Baker) is actually one of the easier yeasted doughs to master. Whether you're a seasoned bread baker or a complete novice, you'll find this recipe to be a true holiday gift!
The dough is enriched with eggs and butter, which makes it soft and pliable and very easy to handle. You don't need to worry about it sticking to your counter as you shape it (and you don't even need to flour your work surface!).
A chocolate babka wreath is festive and whimsical. It's the perfect baked good to bring to a cocktail party or a school holiday gathering, or wrap up and gift for seasonal presents. The baked wreath is quite sturdy, making a nice candidate for shipping in the mail or transporting in the car to your friends and family. You can even bake it ahead of time and freeze it, tightly wrapped, to reheat and serve in the morning.
The technique for making a chocolate babka wreath is similar to a classic babka-shaping method, but even simpler. You roll out, fill, and shape the logs of dough the same way, but instead of transferring them to a loaf pan, you just pinch them into a circle and bake them directly on a parchment-lined sheet pan.
Baker's tip: Feel free to get creative with your fillings. The classic chocolate filling in our recipe is traditional, but this dough will be fantastic if you spread it with jam or fruit preserves, chocolate hazelnut spread, lemon curd, cinnamon-sugar butter, or even cookie butter!

Follow our recipe for the instructions for making your dough. Keep in mind that this dough will look extremely messy at first when you add the softened butter. It's a lot of butter (11 tablespoons!) so it makes the dough very gloppy and wet-looking. Just keep mixing and kneading the dough until it comes together; this can take up to 10 minutes in a stand mixer.
Baker's Tip: Because this dough takes a long time to mix, I don't recommend mixing it by hand. You certainly can, but know that it'll take a lot of elbow grease!

First, divide the dough in half. You're going to make two filled logs.
Working with one half at a time, press and roll your dough into a large rectangle, about 15" x 11". The dough is very forgiving and buttery, so you shouldn't need any flour on your work surface. I like to roll it out on my silicone mat, which keeps my counter from getting too messy!

Spread your filling onto the dough rectangle, leaving about 1/2-inch bare on all sides. If you're following our chocolate babka wreath recipe, you'll want to mix the chocolate filling and let it sit for about 30 minutes to thicken up. This will bring it to a nice, soft, spreadable consistency. If it gets too thick and stiff, just warm it in the microwave for 10 or 20 seconds to soften it slightly.
Remember you're making two logs here; use half the filling in each.

Starting at the long side closest to you, roll the dough into a log.

Pinch the seam firmly to seal the dough. Roll the dough log so the seam-side faces down before you slice it, and trim 3/4-inch off each end to tidy the logs.

Slice the dough log in half. I like to use a serrated knife here, which helps to cleanly cut through the soft dough.
Although I've sliced my dough directly on my silicone mat, it's best to not use a sharp blade on your mat as it can leave a mark. If you do, just take care not to press the blade against the mat itself.
Repeat all of these steps — rolling out, filling, rolling up, and slicing — with your second piece of dough.

Take the two halves of the log, and twist them together into a faux braid. You'll want to work with a little bit of pressure, really twisting them together. Don't worry about the dough getting pressed and pushed or the filling falling out; it will look beautiful even if it's a bit messy!
Repeat with the second log.

You should now have two twisted braids, from your two logs of dough. Transfer them to a parchment-lined baked sheet, and shape them into a large circle. Pinch the ends of the two braids together firmly where they meet.
This can look a little messy, but carry on and pinch them together as best you can. The beauty of a babka loaf is that it looks pretty striking even when it isn't perfect (lucky us!).
Cover the shaped wreath lightly with greased plastic wrap and let it rise for about 1 1/2 hours, until it's noticeably puffy. It won't rise much; that's OK.

Bake your chocolate babka wreath for about 25 to 30 minutes in a preheated 375°F oven. Remove from the oven when it's just beginning to turn golden brown at the edges.
Make the glaze while your babka bakes, and as soon as the bread comes out of the oven, brush the glaze all over it. You can, of course, skip the glaze but what sweet bread isn't improved by a heavy pour of sugary icing? (Hint: None.)
Now you've mastered the most beautiful bread of all! While it's nice to put up winter decorations and twinkling lights, we'll take this edible wreath over all other seasonal decor.
Please bake, rate, and review our Chocolate Babka Wreath recipe!

